backwoodsshooter
there’s always a method to the madness
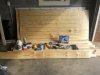
alright guys, believe it or not I love building stuff on my on.
Got most if not all the stuff to build these and have them mostly square lol.
Plans I’m following http://myoutdoorplans.com/bed/floating-bed-frame-plans/
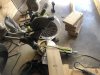
I was able to pick up a sliding miter saw from Home Depot for a decent price.
But anywho, tools aside I’m going to have roughly 125-150 in martial cost for the Queen, not sure yet in the bunk beds.
Not including the stuff I can reuse like the jig, stands, clamps, or the screws.
Nothing is glued and screwed yet lol.
More to come over the next few days
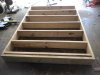
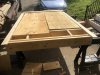
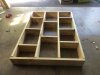
The frame below is the base of the floater for the Queen.
Added the finished base. Only 1/2” off from square. Not bad I guess
Got most if not all the stuff to build these and have them mostly square lol.
Plans I’m following http://myoutdoorplans.com/bed/floating-bed-frame-plans/
I was able to pick up a sliding miter saw from Home Depot for a decent price.
But anywho, tools aside I’m going to have roughly 125-150 in martial cost for the Queen, not sure yet in the bunk beds.
Not including the stuff I can reuse like the jig, stands, clamps, or the screws.
Nothing is glued and screwed yet lol.
More to come over the next few days
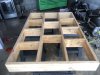
The frame below is the base of the floater for the Queen.
Added the finished base. Only 1/2” off from square. Not bad I guess
Attachments
-
 C33B5C5C-1E7E-4982-879D-6EE9E6AB8861.jpeg130 KB · Views: 73
 -
 F4D373BF-C019-438C-B4C7-A27792DCB6A2.jpeg171.1 KB · Views: 66
 -
 C261BC97-BA74-4011-8E62-11BD2001F7B1.jpeg142.1 KB · Views: 71
 -
 0EDD74BC-394F-453D-9613-64F6564ADF72.jpeg155.6 KB · Views: 68
 -
 C0224D97-75D7-4AF7-9FE6-35F0865A9C8B.jpeg115.8 KB · Views: 70
 -
 2794E17F-A426-4126-B89F-067CDE7EBBA7.jpeg147.4 KB · Views: 58
Last edited: