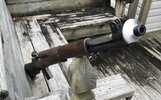
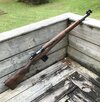
Mini 14/ 300blkout/T20 Garand build

baltimoreed

Well-Known Member
Joined
Jun 12, 2021
Messages
536
Location
Aurora, NC
Rating - 100%
1   0   0
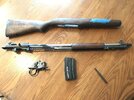
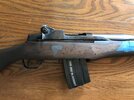
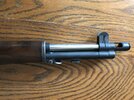
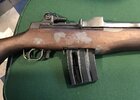
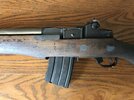
Having built a Mini 30 into a M1a I decided to do another one so in 2018 I started on a T20 Garand build. The T20 was an experimental .30-06 select fire, 20 rd box magazine fed Garand. A predecessor to the M14. They couldn’t get it to run right until the ‘06 round and bolt were shortened enough to give the bolt more time rearward allowing enough time for the mag spring to work correctly. It also would run hot too. Anyway I had Accuracy Systems install a 300blkout bbl with garand bbl external dimensions on my Mini14. I had a friend /local smith do the garand gas cylinder splines and threads. He also combined the rear of the Ruger op rod and the front of the Garand op rod. We did a wag on the gas hole size and op rod spring. When he gave it back to me it would barely move the bolt with factory blkout ammo. I lightened the op rod spring and enlarged the gas port and messed with a bunch of powders. I finally got it to reliably cycle using a case full of LilGun. Of course there were setbacks. The stock is a standard garand stock but the mini action is 3 inches shorter than a garand. There’s a lot of wood and jbweld in it. Initially it was running ok but when I installed the ruger steel reenforcement I changed something and it wouldn’t run. After a lot of tinkering it’s running again. The issue is the garand’s gas system is at the end of it’s bbl so there’s no bullet dwell time so in a bbl that long and a case so small there’s insufficient pressure being created to cycle the bolt and strip rounds out of my mag. It would do 7 rds but that was about all. Solutions were shortening the bbl, op rod, stock and starting all over or I could find a bigger [.223 sized] case that could hold more powder. I came across the 300Hamr in my searches which I’m hoping will work. 0B23A043-A080-4C1E-A5CB-00D8DCCD2A61.jpegD3E52E5E-F329-413C-AF3B-3BA81CCB5260.jpeg45C8DA0D-A4B4-4D20-BFF8-F00104117B0C.jpegF0574836-61E0-46D3-82D8-C027467C5717.jpeg
 
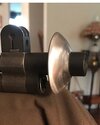
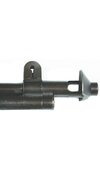
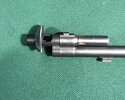
Here’s what their T20 muzzle break looked like. Crazy. This is what I turned on my mini mill. It screws on the aftermarket gas cylinder plug. Still needed work when I took this pix.

Update…Accuracy System Inc got my rifle and is saying 6-8 week turnaround.
32C36146-A7D1-49F5-A4F4-6C698763C7F0.jpeg


4988036A-41A8-4DFF-94A2-64E9A515A396.jpeg
‘Here’s what I built.
0F091FE4-606D-45DE-A3FF-71DEF85CE405.jpeg
 
Last edited:
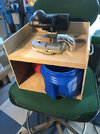
ASI is done with the rechambering and is supposed to return ship today. Going to prep 50 pcs of 223 to 300Hamr tonight. Here’s my HF chop saw setup that I built. The cut cases are kicked into the elbow down to the coffee can below, scrap goes into the hole in the corner and falls into a smaller can.
B4E035E1-2899-460A-96A2-93B65C7B74DA.jpeg
 
Did some stock work on the mag well opening by adding a piece of 3/16 in oak to the front which makes the mag sit more vertical, the mags seemed to be tipping up in the front lowering the rear causing the bolt to override the next rd in the mag. I’m not using the front mag pin. Didn’t want to open the magwell up that much so I'm just using the rear mag catch. I thought that the current failure to feed issue was mag related somehow as I was getting good ejection. What was happening was recoil was moving the mag enough that the bolt would override the next round but if I hand cycled it they chambered every time. Success! [WARNING DO NOT USE THIS LOAD IN AN AR]. Tried 26.0 gr of LilGun /130 gr spy bullet and they cycle, eject and pick up the next rd. Can only get 23.0 gr of LilGun in a 300 blkout. Now to experiment with amounts of LilGun and bullets. Might need to back off a bit for 150 gr. If I get it 100% running I’ll start on the stock artwork.
651808AE-5C33-4F13-B653-8BBE2E01E597.jpeg
 
Last edited:
Think that I’ve got the load about figured out. 25.0 gr for 150 gr bullets but need a little more for 130 gr. Just tried a couple and one failed to strip the next round while the other did. Going to up it a half gr next. Been fitting the lower handguard as it was too tall with too much empty space under the lower end. It unfortunately cracked on that end but I'm going to hit it with jbweld when I brass rivet the steel clip.
C609F967-41F5-4190-880C-2723E2BA7F45.jpeg012D24FE-D2E2-4BDD-BFC5-C7B3A057B322.jpeg
Update 9-28. Started painting on it today. Also built a faux fun switch.
 
Last edited:
Back
Top Bottom