Paint experts out there ?

Lager

Well-Known Member
Supporting Member
Joined
Aug 3, 2017
Messages
2,168
Location
Corn Field, Eastern NC
Rating - 100%
4   0   0
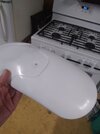
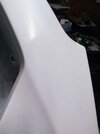
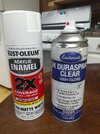
What the heck am I doing wrong ? Im trying to paint the motorcycle and want a matte white clear coat finish. I used the two products pictured, I first prepped the surfaces. Then painted it with the Matte white paint, let it dry for 2 days then hit it with 2 coats of the Eastwood 2K gloss clear . Let it dry for two weeks and then used a 1500 grit buff pad to cut the shine. The result was what I expected on the front fender as you can see. I then did the seat section in the same exact way and time line, all was looking good until just today attempted to take the shine off with the same 1500 grit pad and these cracks showed up in the paint. What the heck happened ?
IMG_20231231_185609183.jpgIMG_20231231_185652581.jpgIMG_20231231_185739506.jpg
 
I’m no ”expert” but having had a similar experience, I’d guess you may have put the clear on a little heavier on the seat section. The solvents in the clear attack the pigment layer. I dread painting with rattle cans, you never know what you’re gonna get.
 
No experience mixing rattle can rustoleum with rattle can 2k clear like that but a few questions.

Were the cracks there prior to painting and just unnoticed?
Perhaps stress cracking in the panel that wasn't evident until the new white paint went on?

Never been around or seen a XR in person, is that panel very flexible? Perhaps a flex additive may be needed?
 
How many coats of primer and was it wet sanded and allowed a lot of dry time between coats? Those hairline cracks look like they could have been there before paint was applied and the paint has brought them out apparent because of the light.
 
Last edited:
I’m no ”expert” but having had a similar experience, I’d guess you may have put the clear on a little heavier on the seat section. The solvents in the clear attack the pigment layer. I dread painting with rattle cans, you never know what you’re gonna get.
You might be onto something with the clear coat attacking the pigment coat, that sure does look like what it is happening Remember when I painted the black fender with the Eastwood black paint then added their clear and it cracked also? When I called Eastwood they told me that I didn't allow their base coat to dry fully and when I added the clear coat it cracked. They told me to not adda clear coat over their black paint because their Black already had clear coat in it. I stripped and just did the black and it came out looking great. Unfortunately Eastwood does not make a white paint in a spray can otherwise I would have used that instead of this two-part process I attempted. Plus,, I did use more clear coat on the tail section then I did on the front fender, good point there too.
 
You might be onto something with the clear coat attacking the pigment coat, that sure does look like what it is happening Remember when I painted the black fender with the Eastwood black paint then added their clear and it cracked also? When I called Eastwood they told me that I didn't allow their base coat to dry fully and when I added the clear coat it cracked. They told me to not adda clear coat over their black paint because their Black already had clear coat in it. I stripped and just did the black and it came out looking great. Unfortunately Eastwood does not make a white paint in a spray can otherwise I would have used that instead of this two-part process I attempted. Plus,, I did use more clear coat on the tail section then I did on the front fender, good point there too.
Ask me how I know. Sometimes you can get away with it if you let the pigment coat cure for a couple of weeks, then spray a very light coat of clear, let it cure (usually several hours for clear), then another very light coat, let it cure, then your finish coat. But the damn stuff never seems to behave the same way twice. I'm about to undertake a rattle-can paint job that I don't want to do twice and suffering from approach avoidance. I don't know what kind of paint I'm painting over, so I guess I'll need to use enamel. Ugh.
 
Paint is all about prep. Lot's of prep before primer, between coats of primer, after primer, between coats of color, after color, before clear, between coats of clear...

You need a primer and paint with a plasticizer when painting over plastic or fiberglass. Otherwise your paint won't flex with the part and you'll get cracks. Never use 2-in-1 or 3-in-1 paint/primer or paint/clear type products. Those kinds of short cuts sound attractive, but never have very good results. If they actually worked, all of the body shops would be using them. Also, always match up your primer, color and clear with the same brand to help ensure compatibility. You also don't want to mix types of paint. Since you used an acrylic enamel for your color coat, you should use an acrylic clear coat, not polyurethane.

How many coats of primer and color did you use before you shot the clear? You want to go with lots of light coats, not 1 or 2 heavy coats.
 
Last edited:
No experience mixing rattle can rustoleum with rattle can 2k clear like that but a few questions.

Were the cracks there prior to painting and just unnoticed?
Perhaps stress cracking in the panel that wasn't evident until the new white paint went on?

Never been around or seen a XR in person, is that panel very flexible? Perhaps a flex additive may be needed?
Another good question,, That panel or seat section is pretty stiff but who knows ? I really dont think that they are stress cracks, I think stress cracks radiate out from lets say a mounting point ? There is no pattern to these cracks and I can feel them with my fingernail and I'm pretty sure they weren't there before because I spent a good amount of time prepping the surface before painting. When I got done with the matte base coat, its looked flawless or just about and scuffed up the base coat before the clear using the same 1500 grit pad and it still looked great . I only added the clear coat to make the bike easier to clean and help protect it from gas spills. Thanks for the input. Thinking about eh suggestion of a flex agent ? I just took the nicely done front fender that had a lot less clear applied and forced it to flex, I mean I worked it over and no cracks appeared.
 
How many coats of primer and was it wet sanded and allowed a lot of dry time between coats? Those hairline cracks look like they could have been there before paint was applied and the paint has brought them out apparent because of the light.
This is my second time painting this bike, the bike was originally gloss black, but its an older bike and the paint was pretty beat up. I repainted the bike a matte black because I don't like shiny stuff and that was about a year ago ? Same brand of paint, just matte black and the paint held up really well. Over the Wintertime decided to change the color of the bike because its cheaper then changing out the color of the Wife and went with White this time. The white paint job looked awesome when I got done with it, even did a quick wet sand buff before the clear applied. The clear looked good till I took the shine off, then disaster.
new xr 3.jpg
 
Paint is all about prep. Lot's of prep before primer, between coats of primer, after primer, between coats of color, after color, before clear, between coats of clear...

You need a primer and paint with a plasticizer when painting over plastic or fiberglass. Otherwise your paint won't flex with the part and you'll get cracks. Never use 2-in-1 or 3-in-1 paint/primer or paint/clear type products. Those kinds of short cuts sound attractive, but never have very good results. If they actually worked, all of the body shops would be using them. Also, always match up your primer, color and clear with the same brand to help ensure compatibility. You also don't want to mix types of paint. Since you used an acrylic enamel for your color coat, you should use an acrylic clear coat, not polyurethane.

How many coats of primer and color did you use before you shot the clear? You want to go with lots of light coats, not 1 or 2 heavy coats.
Think we have a winner here folks !!! I didn't notice that the paint was an acrylic enamel, and the clear coat was a polyurethane until Warhammer pointed this out. This just might explain what looks like the clear coat attacking the base paint forcing it come loose and shrinking it causing the cracks because that's what looks like what happened. That would explain it . So Warhammer, what I need to find is a Acrylic enamel clear, hopefull from Rust-oleum after sanding all this off the body work ?
 
Last edited:
This is my second time painting this bike, the bike was originally gloss black, but its an older bike and the paint was pretty beat up. I repainted the bike a matte black because I don't like shiny stuff and that was about a year ago ? Same brand of paint, just matte black and the paint held up really well. Over the Wintertime decided to change the color of the bike because its cheaper then changing out the color of the Wife and went with White this time. The white paint job looked awesome when I got done with it, even did a quick wet sand buff before the clear applied. The clear looked good till I took the shine off, then disaster.
View attachment 720532
All my painting has been of the hobby variety. I had a Goldwing that I stripped down and changed the color on it. I remember it being a chore taking a great deal of patience. I depended heavily on experts. Our local CarQuest mixes auto paint and they know all about it. A couple of their sales people there do side painting and are really good at it. That being said I am not sure how far you live from me but they might be a good source of info and tech advice conditional on the same people working there as there was about 7 years ago. That is not a bad looking bike there as It is. I am not into black vehicles but that one there looks good with that body style on the bike.
 
This is what Im striving for and was an OEM color back then.
View attachment 720554
I have to agree with you. I like that a lot better. I can give you another idea. What about a technical college that teaches auto body? Sometimes they take on projects and they used to love it when tt was part brought to them so they do not have to store an entire vehicle. Just an idea there. I mean you are talking a gas tank and one or two fenders. It's a teaching dream for something that easy.
 
Think we have a winner here folks !!! I didn't notice that the paint was an acrylic enamel, and the clear coat was a polyurethane until Warhammer pointed this out. This just might explain what looks like the clear coat attacking the base paint forcing it come loose and shrinking it causing the cracks because that's what looks like what happened. That would explain it . So Warhammer, what I need to find is a Acrylic enamel clear, hopefull from Rust-oleum after sanding all this off the body work ?
I think you've got it. Also, you might want to consider this matte clear acrylic from Rustoleum. That way you won't be spraying a high gloss finish over top of a matte finish.

https://www.rustoleum.com/product-catalog/consumer-brands/stops-rust/clear-enamel?ls=285093&lc=Matte Clear
 
Last edited:
Back
Top Bottom