Studentofthegun
From the Land of White Pine and Moonshine
Staff member
2A Bourbon Hound OG
Charter Life Member
Benefactor
Supporting Member
Multi-Factor Enabled
When the weather is nice and not too windy, it's very enjoyable to shoot reactive targets with your precision .22 rifle. After shooting at grapes and other weird stuff, it finally occurred to me that paintballs (the biodegradable kind) make wonderful reactive targets. So I got some paper and came up with a simple way to shoot at them.
At first it might seem a little strange but by the end I think you'll see what I'm trying to accomplish.
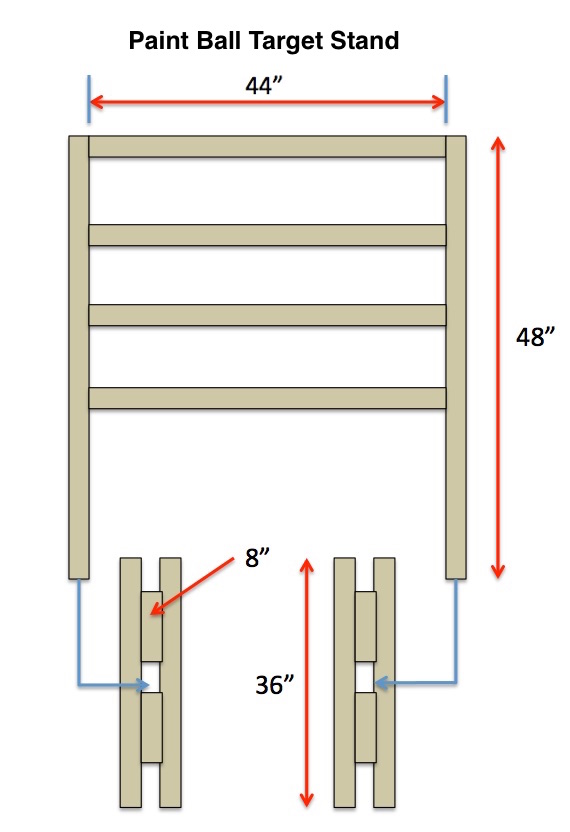
Here is a basic diagram of the stand itself. Not all dimensions are included but this is a very simple thing so I figured a lot of detail isn’t necessary. The materials for this is five 8′ 2x4s. That will give you enough to make the stand and the feet. One of the other goals here is to make something that will fit between the wheel wells of my trucks and will lay flat for transport. My truck has about 49″ between the wheel wells, so I wanted there to be a couple inches to spare. That’s why my cross pieces are 44″ wide. That also leaves some 8″ pieces of 2×4 that can be used in the feet (might be appropriate to call them skids).
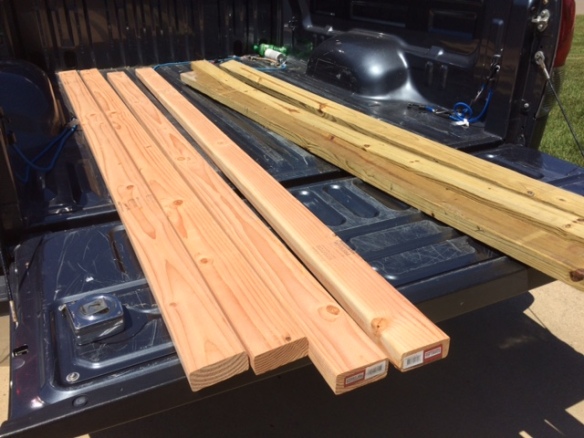
I started the build process with the 2x4s. I had four really nice ones but I had to use a lesser quality 2×4 to have enough material. If the 2x4s are bowed you’re going to have a lot of issues because the frame will be hard to construct so that everything is level. If they are really twisted that is even worse because a twisted 2×4 wont hold the golf tees level enough to keep the paint balls on them. The nicer and straighter the 2x4s, the better.
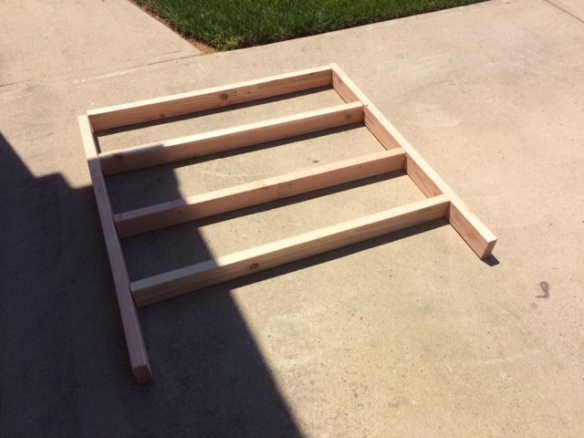
The first step was to measure and mark the 2x4s so I could cut out all the pieces I’d need for the upright part of the stand. Once I marked them and cut them, I laid them out on the ground to make it easier to see what I was doing.
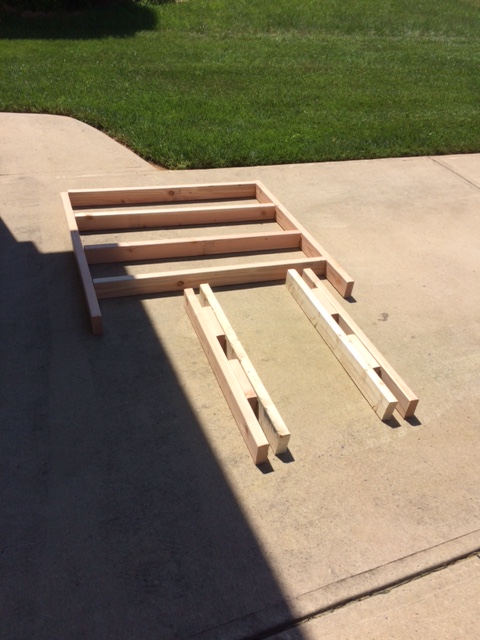
Now it was time to make the feet. I prefer to be able to take the stand apart to take it to and from the range. I made the feet so that all I would have to do is just stick the upright portion of the stand into the feet. The key was to use one of the small pieces of 2×4 I had left over to allow for the upright piece to drop into the feet.
Here are all the pieces cut and laid out:
Now I needed to put the pieces together for the feet.
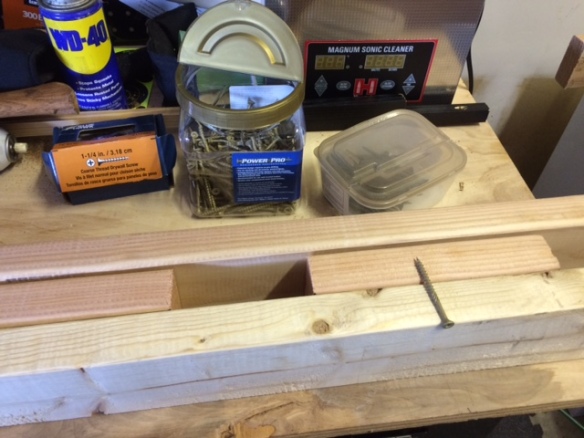
So here is one foot laid out and ready to be screwed together. I put a small scrap piece of 2×4 there in the middle and moved the small spacer 2×4 pieces (the shorter pieces in the middle) together so that there is just enough room for the upright to be dropped in. Then I screwed everything together.
The next step I neglected to take a picture of, but it is still pretty straight forward. I took the horizontal pieces (the ones that are actually going to hold the golf tees and paint balls) and put a line right down the middle of them (the long way). Then I measured every three inches and made a mark. This gave me a location for each of the holes for the golf tees. I then got out my drill and found a drill bit that was just big enough to allow the golf tees to fit snugly. I drilled the holes in all four horizontal pieces and then proceeded to put the rest of the stand together.
There were two things I had to keep an eye one while putting the upright part of the stand together. One was that the horizontal pieces had to be level from side to side and front to back. I used a 4′ level to make sure it was level side to side, and the torpedo level for the front to back.
It also helps to make pilot holes for your screws so that your 2x4s don’t split when you screw them together. Here are a couple pics of the finished product.
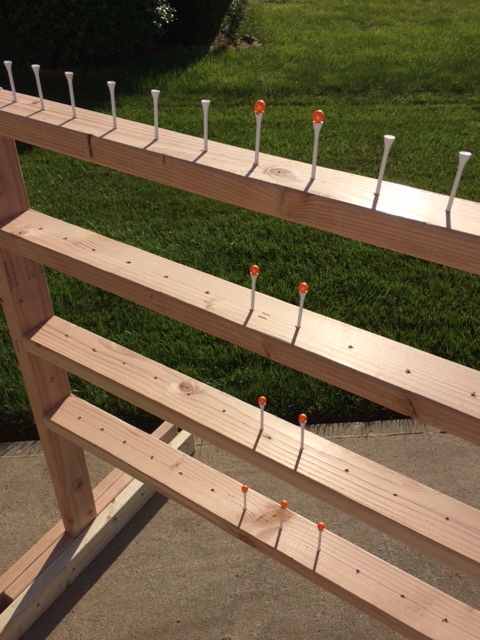
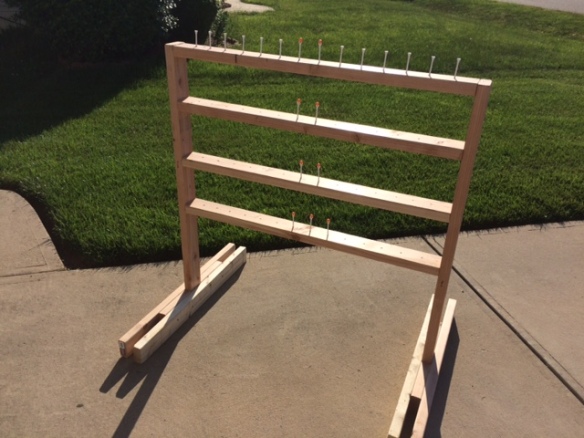
As you can see, once you have the feet done and the upright part of the stand done, all you have to do is drop the upright portion right into the feet. By constructing the stand this way, you can easily transport it by lifting the upright part out of the feet. This way, you’ll have three pieces (upright section and two feet) and everything can lay flat in the bed of the truck. If you want to screw the feet on there that’s fine. If you leave it so it can be taken apart, it makes it easier to carry around and assemble on the range at whatever distance you choose.
The thing one really needs to pay attention to is how level the horizontal pieces are side to side and front to back. If they are not level, or pretty close to level, your paint balls will try to roll off the golf tees.
Also, don’t pick a drill bit that is too big for the golf tee holes. You don’t want the tees to wobble around in the holes because that will make it hard to keep the paint balls on the tees. Another thing to remember is that the width is totally up to you. For me, 44″ horizontal pieces were ideal. If you have a range in your backyard, you could make the stand 6′ wide if you wanted to. It just becomes heavier and more difficult to move. One other thing I should mention is that I put my tees three inches apart. That seems to work well because if you put them too close together, the splatter will sometimes knock adjacent paint balls off the tees. So spacing them out a bit is the way to go. Most of mine are 3 inches apart, but right at the end I think based on the width I ended up putting the last two holes 2.5 inches apart. Remember, this thing doesn’t have to be a work of art, it just needs to work. After all, we’re shooting at the dang thing.
Note that I didn’t bother putting all the golf tees and paint balls on there for the picture. There’s enough there for someone to see how it is supposed to work. This design will hold 56 paint balls at one time.
What we like to do is at the range is put this target stand out at 50 yards. Then we put two shooters on benches next to one another. Each person picks a row, and we see who can shoot the paint balls off the tees without touching the tee. Whoever makes it from one end to the other with the fewest number of misses and the cleanest hits, wins.
The other fun thing to do is take turns hitting the tees on the same row. This leads to significant trash talking and it is especially interesting if the rifles are dead on target and very accurate. If there’s just a little bit of wind that’s even better. Inevitably someone is going to miss due to the wind and then the other guy will try to hit the paint ball before the first guy can get chamber another round and get back on target. Semi-auto shooters might have an advantage here. So long as one is careful not to shoot the stand, the paint balls stay on just fine if things are relatively level.
The paint balls I have pictured here are the small ones. We’ve had enough time now to tweak our rifles to the point that the big ones do not provide enough of a challenge. If the winds are calm it is normal to clear a row without a miss. But add a little bit of wind and that changes everything. It is possible to have so much wind it knocks the paint balls off the tees. But that takes a very breezy day. Here in the South we don’t have that much wind. I guess if you live in Wyoming you are better off shooting at steel plates. Down here, the paint ball setup works pretty well.
Hope this inspires some people to try this out. It looks rather simple as far as reactive targets are concerned, but it has surprised us how much fun we have shooting at these things. For the kiddos, all one must do is move the target stand closer. Or if you have a scope that has low magnification or iron sights, moving it closer might be necessary.
Happy and safe shooting to you and yours,
SOTG
At first it might seem a little strange but by the end I think you'll see what I'm trying to accomplish.
Here is a basic diagram of the stand itself. Not all dimensions are included but this is a very simple thing so I figured a lot of detail isn’t necessary. The materials for this is five 8′ 2x4s. That will give you enough to make the stand and the feet. One of the other goals here is to make something that will fit between the wheel wells of my trucks and will lay flat for transport. My truck has about 49″ between the wheel wells, so I wanted there to be a couple inches to spare. That’s why my cross pieces are 44″ wide. That also leaves some 8″ pieces of 2×4 that can be used in the feet (might be appropriate to call them skids).

I started the build process with the 2x4s. I had four really nice ones but I had to use a lesser quality 2×4 to have enough material. If the 2x4s are bowed you’re going to have a lot of issues because the frame will be hard to construct so that everything is level. If they are really twisted that is even worse because a twisted 2×4 wont hold the golf tees level enough to keep the paint balls on them. The nicer and straighter the 2x4s, the better.

The first step was to measure and mark the 2x4s so I could cut out all the pieces I’d need for the upright part of the stand. Once I marked them and cut them, I laid them out on the ground to make it easier to see what I was doing.

Now it was time to make the feet. I prefer to be able to take the stand apart to take it to and from the range. I made the feet so that all I would have to do is just stick the upright portion of the stand into the feet. The key was to use one of the small pieces of 2×4 I had left over to allow for the upright piece to drop into the feet.
Here are all the pieces cut and laid out:

Now I needed to put the pieces together for the feet.

So here is one foot laid out and ready to be screwed together. I put a small scrap piece of 2×4 there in the middle and moved the small spacer 2×4 pieces (the shorter pieces in the middle) together so that there is just enough room for the upright to be dropped in. Then I screwed everything together.
The next step I neglected to take a picture of, but it is still pretty straight forward. I took the horizontal pieces (the ones that are actually going to hold the golf tees and paint balls) and put a line right down the middle of them (the long way). Then I measured every three inches and made a mark. This gave me a location for each of the holes for the golf tees. I then got out my drill and found a drill bit that was just big enough to allow the golf tees to fit snugly. I drilled the holes in all four horizontal pieces and then proceeded to put the rest of the stand together.
There were two things I had to keep an eye one while putting the upright part of the stand together. One was that the horizontal pieces had to be level from side to side and front to back. I used a 4′ level to make sure it was level side to side, and the torpedo level for the front to back.
It also helps to make pilot holes for your screws so that your 2x4s don’t split when you screw them together. Here are a couple pics of the finished product.


As you can see, once you have the feet done and the upright part of the stand done, all you have to do is drop the upright portion right into the feet. By constructing the stand this way, you can easily transport it by lifting the upright part out of the feet. This way, you’ll have three pieces (upright section and two feet) and everything can lay flat in the bed of the truck. If you want to screw the feet on there that’s fine. If you leave it so it can be taken apart, it makes it easier to carry around and assemble on the range at whatever distance you choose.
The thing one really needs to pay attention to is how level the horizontal pieces are side to side and front to back. If they are not level, or pretty close to level, your paint balls will try to roll off the golf tees.
Also, don’t pick a drill bit that is too big for the golf tee holes. You don’t want the tees to wobble around in the holes because that will make it hard to keep the paint balls on the tees. Another thing to remember is that the width is totally up to you. For me, 44″ horizontal pieces were ideal. If you have a range in your backyard, you could make the stand 6′ wide if you wanted to. It just becomes heavier and more difficult to move. One other thing I should mention is that I put my tees three inches apart. That seems to work well because if you put them too close together, the splatter will sometimes knock adjacent paint balls off the tees. So spacing them out a bit is the way to go. Most of mine are 3 inches apart, but right at the end I think based on the width I ended up putting the last two holes 2.5 inches apart. Remember, this thing doesn’t have to be a work of art, it just needs to work. After all, we’re shooting at the dang thing.
Note that I didn’t bother putting all the golf tees and paint balls on there for the picture. There’s enough there for someone to see how it is supposed to work. This design will hold 56 paint balls at one time.
What we like to do is at the range is put this target stand out at 50 yards. Then we put two shooters on benches next to one another. Each person picks a row, and we see who can shoot the paint balls off the tees without touching the tee. Whoever makes it from one end to the other with the fewest number of misses and the cleanest hits, wins.
The other fun thing to do is take turns hitting the tees on the same row. This leads to significant trash talking and it is especially interesting if the rifles are dead on target and very accurate. If there’s just a little bit of wind that’s even better. Inevitably someone is going to miss due to the wind and then the other guy will try to hit the paint ball before the first guy can get chamber another round and get back on target. Semi-auto shooters might have an advantage here. So long as one is careful not to shoot the stand, the paint balls stay on just fine if things are relatively level.
The paint balls I have pictured here are the small ones. We’ve had enough time now to tweak our rifles to the point that the big ones do not provide enough of a challenge. If the winds are calm it is normal to clear a row without a miss. But add a little bit of wind and that changes everything. It is possible to have so much wind it knocks the paint balls off the tees. But that takes a very breezy day. Here in the South we don’t have that much wind. I guess if you live in Wyoming you are better off shooting at steel plates. Down here, the paint ball setup works pretty well.
Hope this inspires some people to try this out. It looks rather simple as far as reactive targets are concerned, but it has surprised us how much fun we have shooting at these things. For the kiddos, all one must do is move the target stand closer. Or if you have a scope that has low magnification or iron sights, moving it closer might be necessary.
Happy and safe shooting to you and yours,
SOTG


