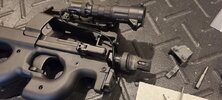
WIP 3D printed Modbutton attachment for PS90

some_kid6

Kings 2:23-24
Supporting Member
Multi-Factor Enabled
Joined
Feb 7, 2020
Messages
1,131
Location
Dur'm
Rating - 0%
0   0   0
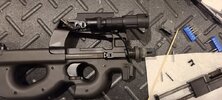
PS90 shows it's age/intended purpose with it's lack of accessory mounting options. There's a few methods people have tried to get a remote switch. One is custom wiring/button mounting on the inside of the stock but it requires a lot of cutting and such. The other option is velcro/double sided tape on a tape switch to the side of the grip. I'm going with option 3 and making my own mounts. It's still in the draft stage but I've got a working prototype now.

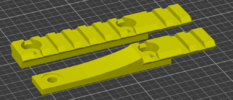
I had to extend the rail I designed for the light so the 7" modlight button cable would reach. This made the rail flex more than I'd like though. I'm going to se about reinforcing some spots by removing grooves but if that doesn't work I'll extend it some more and add a hook for the front of the receiver. This should fix any unintentional snags breaking the rail or the light flopping under recoil. It might be fine with some CF Nylon but I'm assuming most people don't print with that so I'm building it all with PETG first.

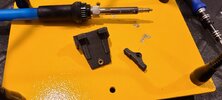
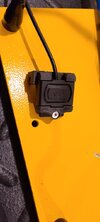
I wanted to keep it somewhat ambi so I'm using the finger guard as a mounting point for the button. It uses the existing screw hole but with a longer screw and uses the hex nut hole for some added anti rotation. It's just reachable for my tiny hands so once I get everything settled I'm going to make a version without the pic rail and only the button. It'll shave of about the depth of the rail and be a bit more comfortable to use.
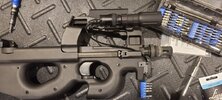
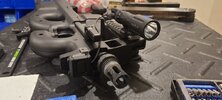
20230325_224417.jpg
20230325_224448.jpg
 
Last edited:
Great idea. if you're using those screws to hold it on, why not just put a switch along side that's held in by those same screws? that way you don't gotta stick a finger in front of the hand stop. going for ambi?

Might also want some cable routing solution. it would suck to get stopped from rocking the charging handle because your cable gets behind it.

Unfortunately it's really hard to reach anything between the front of the hand stop and the foregrip. I've got tiny hands and nothing can quite bend that way.

For the cables, I'm thinking of making a little clip in adapter for the front of the receiver above the barrel for a zip tie point. Hopefully the barrel doesn't melt the cable cause it might be hard to make it not touch


New rail design deletes a rail groove over the bendy spot and printed with 10 vertical walls. The flex is way better now. I bet the carbon fiber nylon will fix any remaining stiffness but I'm calling the rail design g2g with PETG. Ignore my moist filament.

3vefUQOCmKKOTQLeQne4YtTiB6dT65cFTAiOdjeJlIsuwxg4WvVUSfCEuka99RqEZiCly0p2QQgvlCTuVOm_5C-0s8bIZnCnaoxenlnmJrk_TpmWV7QocQTWj334NdDxxupJQeGbc8aL6XKBZPSlv692uF1L6mh1WkkJB92ewWoFGScmtHVxpH7YCTi-mt46w5qx202YUKH7c6e3KzaiC-Zde4-CogL1stN0l1CkPBLXbXwRa7PiVVodxxixr0cDt7960xX2KKVUJvKlZkddC5NU3cro4tGloq2Q6CN4IuKOnLnijfosSegobJTGmQoS_clkfjIyyBUh47vZGc4V_gYFQxIpSyGK7fSs6FGnEnxkuUPgqqzEvPD-9swR2P8r7vsxxOE5HksVkObQC2UPhsTdwYn5OAu7xBRZF7SZer4ojvjsl94La0w2EQM_p8RaAz5DVMLO41H49Z35vnaLTEJ6gpunelSXscYffbQXu0g3D2zs8yJSL8HQEZjwRiIOLUgl-cj63OkLvbuD4s7Tfg4oq-fZp9e7ZHDMkxGCYME3-X8uUiPq5EJ6tvsna9_iar8KSh-i5c2woZFBKZIT9n8I7L-3LiX-ZwUBHH0To94aTml0GdPtcCWIJ3QD5Drv6PZZO2Sy7XFAzpPea0QFqUoFTSDz77McDgtaWe5fAtUoqGk9qrqyuotDaj7bncaMYf284h9RI_-02OKs5s3ZDd59jvUAFTTk3vB_U3reHRe2cFEU_OHMp6SSq8xtRxnSI9RtLNqB3tikpzgRQWFqvhFvfQQa5ul3A-IcO66PQQbq3DDrt6HcBqQzx0w3cA-D8yXXNHuywzEmBliDvxYlIruZokevisZsm1fhoKrkAg64UyRZKB86_98Qw3F_M21D6idbfdeINr8LYnCkfUGbLE57vhxKvPJGqgjOYQbNcXntHx-BBA=w1438-h648-no
 
Last edited:
Cable management should be sorted out now. Made a snap on zip tie mount point.

UOOV2fhZzg-2GfVI4SJb_XpzaQ44rDbJkQTeNaI-NnucJGII-04NYzmf2N05LBeVVHvRjVa4OEzHIdWljgJVTmGgFN-R09qjIERAvbIzwK5h6r9y63w-7Z7FSI-8qIZVq4SgNlxUSs5PXSDIc396ZJx9IO8pvGcgVgf1gVgee24YQUYor5s_xZrQdfnigWlMzRBOLzT9hqocVjkXnsT6kKr53bg9fS6HONssbB2hfUWYPljA7EONYsDr3t62_F2i-dESFOHb_FQ27FoG9Pz1PfJUEfpimYMrTmtzYE_4heGGOSQjhB6s6AhWl0vix6qCmzdGIhH_juw-i8oT3TUIGMW_YC5YhtstLR1GaRjG1y4cZvShvvJpd4RTCOqplN9iE9tFkcDzkpY5tnbYZWO3ujiM9xkVh-gL2Z2L27r8dc56A_nReL-f6F3ANZvD-xN_K0RLPI-SdpEBWBOdPQ05G3KJo_96p9QheeFVjb6CidGlxZX7-EEOkSMVYIpOwCGYAgeRQNkd3z-Px8-bfBhEKJJ6_0mg7tIIxAeb0_Z87B5Uu4KKwYJuUzKCwTEWC8rbIURjdB33zymwWGkRg5DyebKmQiW-nEWfWgCY_AivrPlCKprts18OoKxqSHmqeyrYCNBns5IQMtDfLBJjQAk3T3FcnVe3MVhI7U5flEanaiakGVOFvD6JUI9NXItaQfDT53NomBgDyAg5px6l-XiYlZKWO7ItZbUkljcScwXzcUTMsw23WMLOMZD3XExEEKcAgFn_GKY2Qb4Og_WWqox7f0LE5vSWX6VNSG3uJZ0rMNo8h_pbuuvOrlioaHKD7qXiow0W9T_c9lCHsEbo2q1HhMa2mi9az-6bJxsGjhzOzL65yIFGbmy7np4c8E_Ow-0i0kR9135k-a1Iiq6WGeMw--WQLQBn9iOiG-YYwFOIsE3VtKYNyQ=w2560-h1154-no
 
Success! I swapped out the pic mount clamp on the button for a printed one and got 5mm back. Much more ergonomic now. I'm using a threaded insert for the bottom latch because the wire doesn't clear the receiver when you take it apart so this will let you remove the button easily. It's pretty solid without the stock screw as well. I have a small round stud on one side and a hex stud on the other to prevent rotation. It accepts a standard M4x35mm screw for the stock and a M3x9.5mm (?) flat head for the button latch.

Now I've just gotta figure out printing CF Nylon, though it's probably not necessary.

kx_zya_UuVOa28Om7-5T4OBWjtNEoynr34zy2-QVunSQ3dObAFdogrZ66bNrYnztzzOIX6nBrd3bXL_84FN-DL2w5VRtNdJkuZaoGpoW1-5CBLEOx70apXkbmX3rJBgBMBmqHC3g7d43VUUEvbxhg60to2xMhx7mqWCAWRvhJWgWrl7JuYqfN6p-P3gza8HeOTsmiAXJgocb5QjY6fOLTfow68NBvE3mBO4u6-I2F1tYYP-NieRCSNLyHS7QMjx73d6g6JDW6eRn6m08aLUAqP7mGFBRtvGDwY1zeigs5sPFoUCSKu2o7_omg9emzh03cSlkGkGdI11RMnEuL-Hotu5WRF6Zyr0XJauDFDPUpY5t7q-gjjvpwDSckWLCY_MPydVulloG64VR9c6O95mEWahqwFLZ728Ni1rJGPXL__aXU6uhAinwbqAYGsHxpRHy47bSa3xJl8uoEJCs5o63PpSXItmSb9D3IqcWYNKttvfJmvk4QjgnRsCfSc1k5M5lYy8RPelkxO-KT84K9AbIZyrXCSmE2cOpHhQDygeDt85opV3035hx6XngBu1EC4E-ELPeLOBJIl6fkUVJtIutNxd33edoYj1naywbVcZ05WmQ5AWG69CUiS7MDvpklTlC7mJy7v6sHJVpu9FLivTB-rZtuOQEReh8RUvn-UfDrLCKaTLBXHaIIGBHnMSp7h7dB2TluGxNyS_TEfj0Le4eqCsxH5U1TSJ_wA6r5WNWJIohXE3_XRhXJUgCpMJZUNQ0h8hflxeUZWdM6dW4r1_p9S77bYaikQGsfj4couax7OTOEnGiKHSzEdNjUTRE7KAoKgHI70rjgNM3fVWdQPDtjikx8jQSpJVCWxaMis1BUi0NNfKKHkyi0La075AJeN5qrAvvHqeBqIa-LVb6mg851W7Fgz62qvypdtJXqfjXUcWUX8ysNQ=w1438-h648-no

KZAk8jVb2BAPk2NeAKimuuLZQvx833fGh_IXoEkT9N1vKGLbr_756tB_zdJprUe9M-yEH-gAOF19Q_Kj8zto6E1oAmJNQxwAR65kNtlbMWUeSyakGn9KRN_x3OIX01_2pWS5ziL9cV1Ubi1Wp0CxL0lzSey0nOFZKHBlTLlnDmYTpesVtUYXRrJvWQDzYLUo8zNF4_dOVK1VKX0_oIEqCawzgvo-bsEPj7F6zZTFBOe-dpdc_zthq-7AHPtLXBSdi9hqNWeRjZgyL6i98X4LFq9F7lIEJ8dO4hsGeXoSdFe3PNRHDWem9VL0bb4Jz0gh86iDR8u5kcTWAdIN640hbHPCE16f5cwDzbPQyMrSHdOf0YAimFtAUfA_6JbzuqB9vPK6wHor9E6r5Wq7sL59defyG_nU2Y24mSsBpXcX666eueu2nixUI0N3MqrkkyWnAkG6g_9xJTlzdvndY2nU7AUmz-Ya9n4S51qIsNolPSLfxRk0ty_iEo52HQk_hf5ioTmRVnUysNBZGKZtGp_W_f5HIjaXV24V4emPdFNyEJ6xn_In55j2hsx-LTh3W7lzRpIW242J_cKHFilhnHY7L4bi-ftSLNw5tXTkvOGijFA0RQuJF1JcWOYiVzJE_CxwXwJnh-IZAVmnvaF6A-RQq-Qaj97_WZrqPGAx7lk06Ai3EdWNQXBc-kO6KIQqFxITlxLnayJj-ODGfqExD-7-jc_mM1XCuP5LQHsltOauWdMeuNEtNCx-0PwC7lAGAOkzZ8w5IYxOPY1KnuR7vrATO5DLB32FbHomtvGEuaXQfPsX8nR5L0btQpfPVCnGadI66ufWLxSfhjQyoyj8AdOhl-xNnPk7o8A09agdFo12jX2Z-2vZONbp_2PB5N5vio9ayAcyapB8spFlqzEw8ejiLdAyimCvLGxkO4qkPPeR4Tb2T5XchQ=w1438-h648-no
 
Got it printed in CF Nylon and installed with a 35mm screw. The screw honestly didn't seem very necessary but I didn't like having the open hole. I've redesigned the pic rail to use less material as well since you can't use anything behind the light anyways.

20230331_003015.jpg20230331_002020.jpg20230331_002147.jpg

1680237390608.png
 
Last edited:
Chamfered the slim model and got it all assembled. Works great! Cable is nice and out of the way and everything feels secure.

Link to files

OqCMMnQwlMpZ32602HoJbV_Wn5lxFyBF4MPr8TkEKKKz0C76Q9KvTIbh72SkwrtrWe6c6Xqo_qIwiNQG8g7KB_NBhOJpsn_-qJNoLFSuAopexljUS5ZshRCSnDvwKDzLM8Sugx8CX2jDp7QM2XaEmVvLatiz9I62CcJZNHUH0bca_fWJGRMTtUXctoLkxluqQ1_MoTjRgTY7L0_3ltAoiaBURqc11HPzHzAu1tB8G4gdcPTO54SDWorNZepfOiXifZImR58vSkDfXhR4OweN4ynVGPPIrTcqhfItos7dSZVHfJz9okdZHtQUWv03ofTkdW9sB1UHDlBIdpn1otNxnhTzJBoYUdkSiHxH5XGrqJavVnMiT6V3dmHMe9YxSnJUtVOaf9wKX4mqh4DhIf5OH7lFOoJ5fb0iZB_t-dmi3jru0FUjJNs6cBuqQ1nmYDeWZJ4RALoHsMlOBvceDWeKUZL8AYPQnWallGJ6VEMX4TTfSKo6dlkCX34bzOT30rKVxzPEtBKlZULkI4SxTEIALl9eC8OLVkr33d55_wBg-WWON8diU7etM2rLXEiAKsZbZWLid5Jxz9g005AMZn0_6Pjs20y7NsrQFBvxxGCaDFcrmUvbQHlTulOFex3GE7Ya3KY4IgMReafdD-j9yFvT-hpjzoLIQYtdfSkceFwVT-mjmu-0MXVWVqH8y0fRCCATtSBpFE9J0KrkcKjhLz22drcl27_S-kKfvcc4nmUZL4R-0h7_t8FydVrZu1evIzs22eAPUYLIrYQkIh3YFXZxkSw5vmAokEl5eKNbSep8a7zn7aq9xYxTKsG2E2pTJB0oaKdpxZZF5luBNvTK5hlp6YHMdRNzn0MkQpK5hYMZ-PUE2tSMoljt9xH1sa6eFbnykoRAs62Dt45vZco9aQt2KBCKiNyJ_85EL0GpZs8GntHKpYuZNQ=w1438-h648-s-no


PS90 Pic.jpg
 
Back
Top Bottom