
Philosofarmer
Well-Known Member
This year one of our family goals is to be "counter cultural," kinda our funny way of saying we are going to make some cultured foods: cheese, kraut, kimchi, make some sourdough, and for the adults, brew some cider.
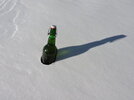
Today was bottling day so if you just wanted to see the pics just scroll down. I've been brewing Hard Honey Cider for 15 years now, way before all the Hipsters and micro-breweries caught on. I wasn't a forum member until recently so I thought it would be cool to share an easy DIY project as I continue to dip my toe into CFF. This could just as easily have gone in the "Homesteading" section or the "Prepping" because it is basically just food preservation. Nothing could possibly be more comforting than to be home sipping on homemade brew when the world goes to pot, and be able to make it with free apples every year thereafter in a form that will last the whole year and only get better with time. Last winter, the boys and I rebuilt our apple cider press, which was getting a little worse for the wear. This Fall, as always, we went picking apples. My wife canned some and I made my annual batch of cider. I have encluded the whole process but today was my favorite and final stage, bottling!!!
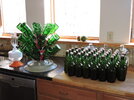
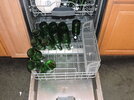
My method is a very economical and natural way to preserve cider. I got my flip top bottles for free and have reused them for years. The only specialized equipment needed is a vessel for fermenting, an airlock, a bottle rinser or brush for cleaning the bottles, and some sanitizer to rinse with, (I use Star San). You can use a dishrack to drain but I scored for free the bottle-drying "christmas tree" in the photos below from my brother. I don't know what this would cost per bottle if I wasn't foraging for free apples and keeping bees, but for all you reloaders out there if you could source your bottles and your apples and all you had to buy was honey (some use sugar which is even cheaper) cost would be less than .50 cents a round....errr bottle. I have like .10 cents into each bottle. 😉
Brewing is so easy as long as you are using sterilized equipment and are patient. I encourage you to try it making a big batch so it's worth your time--5 gal or so but you can make cider in a 1 gallon carboy. I don't use chemicals to kill yeast, I keep it fairly natural so I use heat instead. Too much heat makes it cloudy, so watch your temp but if it gets cloudy don't worry it won't effect the taste. Particles will fall to the bottom out of suspension over time. Of course you can skip pasteurization and just use the wild yeast on the apples, which has yielded fantastic cider for me in the past. However, I have grown to prefer the method below.
A word about fermentation. Basically, yeast will consume sugar, making two by-products. Alcohol and carbon dioxide gas. Brewing needs to happen out of the presence of oxygen which is why we use an airlock. Carbon dioxide pushes the oxygen out of the fermentation vessel. If we did not exclude oxygen we would end up with vinegar rather than alcohol. So if you mess up a batch of hard cider don't throw it out, you might just have some good raw Apple Cider Vinegar on your hands.
Press your apples into cider or just buy some raw cider (must have no preservatives). Pour it through an old clean t-shirt to filter out the chunky particles. At our homestead we have milking goats and so I filter our cider through our milk strainer to get it really clear to start with. Pasteurize the cider to kill the wild yeast in the raw cider by heating and gently stiring until you get to 160-165 F. Turn off the heat and while your cider is warm add 1 lb of honey (or sugar) for every gallon of cider. Stir to dissolve and let it cool down. This next step, (black tea/tannin) is optional but I have found adding tannin adds a lot of complexity and deals with off-flavors. While the cider is cooling make some black tea. I'd say a tea bag per gallon of cider with just enough water to make a strong concentrated tea, and add it to the cider. Black tea will provide tannin and is an economical and more available alternative to tannin. In times past, oak barrels would impart tannin to cider, you can order wine tannin or oak chips as well but it's a lot of fuss. Now that all the tea and honey/sugar is diluted and stirred in, wait for the temp to get low enough to safely pitch in your yeast (be patient). Follow instructions on the yeast packets regarding temp. I just stock one trusty heavy-lifting yeast that has never let me down, Lalvin EC-118. This particular yeast is best pitched between 95-98 F. Note: Lalvin EC-118 is good for all kinds of things: cider, Perry, mead, country wines, Skeeter Pee (very tasty lemon honey wine for the summer time). Anyway, when you come down in temp to the specified temp, pitch a sachet of yeast right in. Some have directions and ask you to dilute, but with this yeast I don't even fuss with all that, I just pitch it right in. If you are new to brewing just pitch the entire sachet in, no matter if you are doing 1 gallon or 5, pitch the whole sachet in. Ok!!!! now you put this brew in a primary fermenter, seal the top and stick an airlock on the top. Put it somewhere in the house for 2-3 weeks that is out of the way, that is out of direct light, and stays 60-70 F. You should see it begin to bubble in a couple days and bubbling like gangbusters in a week. When your bubbling starts to slow way down it's time to put it in a secondary (sterilized) carboy and let it age. You will notice in your primary batch that the bottom of the fermenter will be covered with "lees". This is dead yeast and sludge that falls out of suspension. You only want to siphon the clear liquid off the top. You make this transfer by siphoning it from one vessel to the other without stirring or agitating it. Oxygen is your enemy so you want to avoid agitation and leave as little air space at the top of the secondary fermentation vessel as possible. You can do this a couple times or just once--just realize the more you transfer the more chance of mixing oxygen in and making your batch turn to vinegar, (unless that's the goal).
After you have let this go you have to make a choice. Do you want carbonation? Do you want a sweet tasting cider? So here is the deal. The fermentation needs to be complete before you bottle or you will just make a bottle bomb. You have three choices. 1)Bottle as is without sweetening and with no carbonation...this is more like "apple wine" 2) you can backsweeten with a non-sugar sweetener and have a slightly sweet non-carbonated cider or 3) you can have a carbonated cider sweetened to your liking. Either way you choose leave sufficient headspace at the top and don't overfill.
I have done it each way, but my wife and most of the people I share with prefer the third option. Here is how it goes. I sweeten and taste-test first to get the sweetness right. We have to use non-sugar sweeteners at this point because if we were to use sugar the yeast would start up and we would be back to our bottle bomb scenario. Most prefer erythritol, and I certainly do. I do not like to use stevia but that is an option, as is Xylitol but if the later is consumed by dogs it could be fatal. The range for erythritol is something like 3-9 Tbs per gallon depending on your taste. I use 4 TBs per gallon for a semi-sweet cider. Now, for the carbonation. I know I just said we didn't want to add sugar or we would have a bottle bomb, BUT, we are going to add a very small, measured amount of dextrose (corn sugar) that will give us the bubbly fizz but not make a glass grenade if we do it right. This is called bulk priming and dextrose is the perfect sugar for this. We are just doing a small amount to prime the bottle with a sugar that yeast can quickly consume. When they consume it fermentation is minimal and we have gotten our carbonation. Here you can mix it in bulk and then bottle and cap (my preferred method since I do large batches and it is far more economical) or you can buy pre-measured priming tablets you drop right into the bottle before capping your brew. These are supper nice and very convenient but also bring the cost per bottle up a bit. First timers, just buy the tablets, we want you to have success!!! Bulk priming at one oz per gallon has been just right for me. There is actually a third way to carbonate and that is to force carbonate with a keg. I find bottle conditioning to be low fuss and produce a good result.
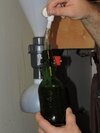
So, today I washed up all my bottles, sterilized them, slipped on my swing-top gaskets, back-sweetened, bulk primed, and bottled up my brew. See Pics. It will need at least 14 days to properly carbonate. One last thing...when you are bottling up your brew and capping with metal capper then let it set for a hour before capping. If you have the swing tops, the procedure is to seal, wait 6 hours and then burp it and reseal. What we are doing here is letting any oxygen out since we just gave dormant yeasts something to work on and letting carbon dioxide to dominate the air space in the bottle. That allows us to bottle condition for as long as we desire. Some folks burp their bottles more but I have found once anywhere between 6 and 12 hours after bottling is sufficient.
Age at least a month but if you can wait 3-6 you will be glad you did. I have aged for up to 2 years but find that was too long and didn't do anything for the flavor.
Always chill before serving!!!!!!! and Enjoy.
Let me know if you are a fellow brewer and what kind of stuff you have made. If you followed this recipe and are brewing for the first time, please let me know about it.
Cheers,
The Philosofarmer
Today was bottling day so if you just wanted to see the pics just scroll down. I've been brewing Hard Honey Cider for 15 years now, way before all the Hipsters and micro-breweries caught on. I wasn't a forum member until recently so I thought it would be cool to share an easy DIY project as I continue to dip my toe into CFF. This could just as easily have gone in the "Homesteading" section or the "Prepping" because it is basically just food preservation. Nothing could possibly be more comforting than to be home sipping on homemade brew when the world goes to pot, and be able to make it with free apples every year thereafter in a form that will last the whole year and only get better with time. Last winter, the boys and I rebuilt our apple cider press, which was getting a little worse for the wear. This Fall, as always, we went picking apples. My wife canned some and I made my annual batch of cider. I have encluded the whole process but today was my favorite and final stage, bottling!!!
My method is a very economical and natural way to preserve cider. I got my flip top bottles for free and have reused them for years. The only specialized equipment needed is a vessel for fermenting, an airlock, a bottle rinser or brush for cleaning the bottles, and some sanitizer to rinse with, (I use Star San). You can use a dishrack to drain but I scored for free the bottle-drying "christmas tree" in the photos below from my brother. I don't know what this would cost per bottle if I wasn't foraging for free apples and keeping bees, but for all you reloaders out there if you could source your bottles and your apples and all you had to buy was honey (some use sugar which is even cheaper) cost would be less than .50 cents a round....errr bottle. I have like .10 cents into each bottle. 😉
Brewing is so easy as long as you are using sterilized equipment and are patient. I encourage you to try it making a big batch so it's worth your time--5 gal or so but you can make cider in a 1 gallon carboy. I don't use chemicals to kill yeast, I keep it fairly natural so I use heat instead. Too much heat makes it cloudy, so watch your temp but if it gets cloudy don't worry it won't effect the taste. Particles will fall to the bottom out of suspension over time. Of course you can skip pasteurization and just use the wild yeast on the apples, which has yielded fantastic cider for me in the past. However, I have grown to prefer the method below.
A word about fermentation. Basically, yeast will consume sugar, making two by-products. Alcohol and carbon dioxide gas. Brewing needs to happen out of the presence of oxygen which is why we use an airlock. Carbon dioxide pushes the oxygen out of the fermentation vessel. If we did not exclude oxygen we would end up with vinegar rather than alcohol. So if you mess up a batch of hard cider don't throw it out, you might just have some good raw Apple Cider Vinegar on your hands.
Press your apples into cider or just buy some raw cider (must have no preservatives). Pour it through an old clean t-shirt to filter out the chunky particles. At our homestead we have milking goats and so I filter our cider through our milk strainer to get it really clear to start with. Pasteurize the cider to kill the wild yeast in the raw cider by heating and gently stiring until you get to 160-165 F. Turn off the heat and while your cider is warm add 1 lb of honey (or sugar) for every gallon of cider. Stir to dissolve and let it cool down. This next step, (black tea/tannin) is optional but I have found adding tannin adds a lot of complexity and deals with off-flavors. While the cider is cooling make some black tea. I'd say a tea bag per gallon of cider with just enough water to make a strong concentrated tea, and add it to the cider. Black tea will provide tannin and is an economical and more available alternative to tannin. In times past, oak barrels would impart tannin to cider, you can order wine tannin or oak chips as well but it's a lot of fuss. Now that all the tea and honey/sugar is diluted and stirred in, wait for the temp to get low enough to safely pitch in your yeast (be patient). Follow instructions on the yeast packets regarding temp. I just stock one trusty heavy-lifting yeast that has never let me down, Lalvin EC-118. This particular yeast is best pitched between 95-98 F. Note: Lalvin EC-118 is good for all kinds of things: cider, Perry, mead, country wines, Skeeter Pee (very tasty lemon honey wine for the summer time). Anyway, when you come down in temp to the specified temp, pitch a sachet of yeast right in. Some have directions and ask you to dilute, but with this yeast I don't even fuss with all that, I just pitch it right in. If you are new to brewing just pitch the entire sachet in, no matter if you are doing 1 gallon or 5, pitch the whole sachet in. Ok!!!! now you put this brew in a primary fermenter, seal the top and stick an airlock on the top. Put it somewhere in the house for 2-3 weeks that is out of the way, that is out of direct light, and stays 60-70 F. You should see it begin to bubble in a couple days and bubbling like gangbusters in a week. When your bubbling starts to slow way down it's time to put it in a secondary (sterilized) carboy and let it age. You will notice in your primary batch that the bottom of the fermenter will be covered with "lees". This is dead yeast and sludge that falls out of suspension. You only want to siphon the clear liquid off the top. You make this transfer by siphoning it from one vessel to the other without stirring or agitating it. Oxygen is your enemy so you want to avoid agitation and leave as little air space at the top of the secondary fermentation vessel as possible. You can do this a couple times or just once--just realize the more you transfer the more chance of mixing oxygen in and making your batch turn to vinegar, (unless that's the goal).
After you have let this go you have to make a choice. Do you want carbonation? Do you want a sweet tasting cider? So here is the deal. The fermentation needs to be complete before you bottle or you will just make a bottle bomb. You have three choices. 1)Bottle as is without sweetening and with no carbonation...this is more like "apple wine" 2) you can backsweeten with a non-sugar sweetener and have a slightly sweet non-carbonated cider or 3) you can have a carbonated cider sweetened to your liking. Either way you choose leave sufficient headspace at the top and don't overfill.
I have done it each way, but my wife and most of the people I share with prefer the third option. Here is how it goes. I sweeten and taste-test first to get the sweetness right. We have to use non-sugar sweeteners at this point because if we were to use sugar the yeast would start up and we would be back to our bottle bomb scenario. Most prefer erythritol, and I certainly do. I do not like to use stevia but that is an option, as is Xylitol but if the later is consumed by dogs it could be fatal. The range for erythritol is something like 3-9 Tbs per gallon depending on your taste. I use 4 TBs per gallon for a semi-sweet cider. Now, for the carbonation. I know I just said we didn't want to add sugar or we would have a bottle bomb, BUT, we are going to add a very small, measured amount of dextrose (corn sugar) that will give us the bubbly fizz but not make a glass grenade if we do it right. This is called bulk priming and dextrose is the perfect sugar for this. We are just doing a small amount to prime the bottle with a sugar that yeast can quickly consume. When they consume it fermentation is minimal and we have gotten our carbonation. Here you can mix it in bulk and then bottle and cap (my preferred method since I do large batches and it is far more economical) or you can buy pre-measured priming tablets you drop right into the bottle before capping your brew. These are supper nice and very convenient but also bring the cost per bottle up a bit. First timers, just buy the tablets, we want you to have success!!! Bulk priming at one oz per gallon has been just right for me. There is actually a third way to carbonate and that is to force carbonate with a keg. I find bottle conditioning to be low fuss and produce a good result.
So, today I washed up all my bottles, sterilized them, slipped on my swing-top gaskets, back-sweetened, bulk primed, and bottled up my brew. See Pics. It will need at least 14 days to properly carbonate. One last thing...when you are bottling up your brew and capping with metal capper then let it set for a hour before capping. If you have the swing tops, the procedure is to seal, wait 6 hours and then burp it and reseal. What we are doing here is letting any oxygen out since we just gave dormant yeasts something to work on and letting carbon dioxide to dominate the air space in the bottle. That allows us to bottle condition for as long as we desire. Some folks burp their bottles more but I have found once anywhere between 6 and 12 hours after bottling is sufficient.
Age at least a month but if you can wait 3-6 you will be glad you did. I have aged for up to 2 years but find that was too long and didn't do anything for the flavor.
Always chill before serving!!!!!!! and Enjoy.
Let me know if you are a fellow brewer and what kind of stuff you have made. If you followed this recipe and are brewing for the first time, please let me know about it.
Cheers,
The Philosofarmer


")


