Switch Replacement Question

East of Here

De-gen from Upcountry
2A Bourbon Hound OG
Life Member
Multi-Factor Enabled
Joined
Dec 29, 2016
Messages
1,747
Location
RTP
Rating - 100%
5   0   0
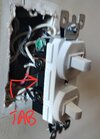
So, I had a light switch break. Unfortunately, it is not a "simple" single switch. This is a dual switch that has one switch on the top that controls the front exterior porch light, and a second switch on the bottom that is one of 3 switches that controls the interior foyer light/chandelier (this one, one at the bottom of the stairs and one at the top). So the bottom switch is a 3 way switch. The other wrinkle is that the front porch light (top switch) is on a different breaker (circuit) than the interior foyer light (bottom switch). I could not find the exact make/model replacement switch, but found one that the fine folks at Home Depot say does the same thing.

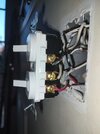
My issue is that the wiring points on the new switch are not exactly the same as the old switch, and I don't want to wire it up wrong and fry the new switch or set the house on fire. Below are the current (no pun intended) switch and replacement switch side by side. On the existing switch, the connections/wires on the left side from top to bottom are black, empty, black. On the right side from top to bottom they are black, white, red. My question is whether the connections are actually the same on both switches (despite the difference in location) and whether the wires just go to the same relative positions on each switch? It looks like it should be, but I have been wrong before, so...
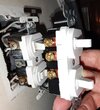
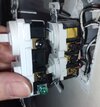
IMG_20230102_132912.jpgIMG_20230102_132952.jpg

IMG_20230102_133018.jpg
 
As you're holding it in the picture, it appears as though the 3 way is the top switch.

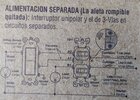
Your 2 separate lines would go to the black screws. One from each circuit.

Your single out feed would connect to the bottom (in your picture) brass screw on the other side. Your travellers from the other 3 way would connect to the two above.

Disclaimer: I'm not an electrician but that's what it looks like from the pictures and the schematic.

Shut off the two circuits at the breaker. Double check with a meter or tester.
 
Flip that new switch upside down. Ground lug up. Two common lugs to the left. Three lugs to the right. The lower two will be the travelers for the three way circuit. The top single lug will be for the other circuit.

CHRIS
Thanks! So just to make sure I understand: If I flip the new switch over, the wires and lugs correspond with the same way/positions they are on the old switch - just with the top left green lug on the new switch being left empty the same as the middle left lug/ground is currently left empty on the old switch?
 
Thanks! So just to make sure I understand: If I flip the new switch over, the wires and lugs correspond with the same way/positions they are on the old switch - just with the top left green lug on the new switch being left empty the same as the middle left lug/ground is currently left empty on the old switch?
Yes. The new switch is being held upside down in the provided picture. Then wire on the same screws from the old one. DO NOT PUT ANY BLACK, WHITE, OR RED WIRE ON THE GREEN GROUNDING SCREW. Then find the bare copper or grreen wire in the box and put it on the green screw.

Note: Make sure you have the correct breakers off in the panel or throw the main during daylight time.
Thanks! There is no bare copper or green wire anywhere that I can see, but I have not yet removed the old switch yet where I can really see in the box/wall, because I did not want to mix up any wires before I knew for certain where they went. There is nothing (bare or green) connected to the "empty" (middle left) lug on the current switch, and I did not remove anything. So if there is NOT a bare or green wire, can I assume it is still okay to wire this new switch up without and just leave the green lug empty?

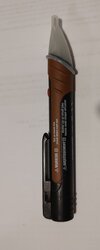
And I gave up and just threw the main breaker when I first pulled it out, because the porch light is not labeled anywhere on the breaker panel and I got sick of running back and forth trying different breakers. That pretty much ensures that I don't light myself up. Having accidentally lit myself up a few times over the years, I now use this little current tester religiously:

IMG_20230102_183615.jpg
 
Yes. Proceed just like the old switch. You may find the bare copper or green wire but if you don’t there is most likely a wire nut in the box with green or bare copper all bundled together. You can strip a coloered wir of the jacket, screw it on the green nut, then put it in the bare copper bundle under the wire nut. If it wasn’t attached previously it should have been. I will close my eyes and you can do nothing with the green screw while you push it all back in the box as well.
 
Don't forget to get a good light switch cover.

You wouldn't want us to judge you, or anything.

il_1140xN.2540501966_j5bn.jpg
 
Don't forget to get a good light switch cover.

You wouldn't want us to judge you, or anything.

il_1140xN.2540501966_j5bn.jpg
I ain't even offended. I know what I don't know, and am not afraid to ask for help. Except when it comes to driving directions. I never ask for those. That's a natural law, I think.
 
If you haven't already done it, do 1 side at a time. So you don't mix up the wires.
 
Yes. Proceed just like the old switch. You may find the bare copper or green wire but if you don’t there is most likely a wire nut in the box with green or bare copper all bundled together. You can strip a coloered wir of the jacket, screw it on the green nut, then put it in the bare copper bundle under the wire nut. If it wasn’t attached previously it should have been. I will close my eyes and you can do nothing with the green screw while you push it all back in the box as well.
Okay, so I did this (did not see a bare copper wire in there anywhere) and connected it exactly like the old switch. But now, neither switch works (well, the switches flip, but now neither light comes on). There is power at all points, per my current tester/pen thing. I even switched it one wire at a time to make sure I did not mix any up. The "directions" in the switch package said that if it was different circuits, there is a little metal tab to break off on the left side (see picture), which I did. That is the only other thing I think I could have screwed up. Could it just be a bad new switch? Any other potential issues that might be present other than my own lack of knowledge on the subject?

(And for the record, I take full responsibility for any issues that may arise from my own DIY attempts...)

IMG_20230109_131553.jpg
IMG_20230109_131720278.jpg
 
Correction. The porch light (should be the top switch) is on, and flipping the switch has no effect. The foyer light is off, and flipping the switch has no effect. So the wiring order has to be funky, somehow.
 
I could tell you how to find out which wire goes where as in travelers, hot wire, wire to light fixture but it entails ohming wires and meter reading with wires off. I would leave that to an electrician. I’ll look at it later after service calls.
 
I could tell you how to find out which wire goes where as in travelers, hot wire, wire to light fixture but it entails ohming wires and meter reading with wires off. I would leave that to an electrician. I’ll look at it later after service calls.
Any help/explanation is appreciated. I have a buddy that can understand and explain all the technical stuff (he is an airline A&P mechanic by trade) to me, and he normally comes over and helps me with this kind of thing. Unfortunately, he is in the middle of slowly passing a large and stubborn kidney stone, and I just am not going to even mention my petty maintenance issues to him right now. He's got enough stress right now. But if I do have to wait, it will not kill me either. (Unless I did something that is gonna start a fire later...🙊)
 
Was the tab missing on the original?
Not to be a wise guy...
Does the original switch have off on imprinted or are both without any imprints?
 
Last edited:
Was the tab missing on the original?
Not to be a wise guy...
Does the original switch have off on imprinted or are both without any imprints?
The original did not have a tab or even a slot where it looks like a tab would have been. Both switches have one switch with on/off imprinted, and one switch with nothing. On the original, the unmarked switch was on the top. On the new one, the unmarked switch is on the bottom.

Another correction: The porch light had a loose connection at the fixture, and the top switch now turns the porch light on and off like it is supposed to do, so it is working "normal". But the bottom switch still does nothing - except that I went over and turned the foyer light on at the switch at the bottom of the stairs. I then flipped the new lower switch, and the foyer light turned on and off like it is supposed to. I figured out that if I leave the new switch "on", the stair switch works. If I turn the new switch "off", the stair switch does not work. The opposite is also true. If the stair switch is off, the new switch does not work. If it is "on", the new switch works. It kinda works the same way with the upstairs switch. It's like one has to be turned on for another to work - but that also kills the third switch. I haven't figured out if one is "dominant" or if they are just mutually exclusive in some rotation.
 
Sounds like you have the travelers in the wrong place. However, without being there with a meter to test it, I’m not much help.
 
First, with power off, I would break the tab so each switch has their own feed and see if it works as before, if not then rewire the new marked on/off switch to match the original, then the new unmarked (three way) to match the original.
 
Last edited:
First, with power off, I would break the tab so each switch has their own feed and see if it works as before, if not then rewire the new marked on/off switch to match the original, then the new unmarked (three way) to match the original.
I already broke the tab off this switch before installing it, and then wired this new one in exactly the same order as the "old" one was wired. On both, the unmarked switch is the top and the marked switch is the bottom.
 
Back
Top Bottom