fieldgrade
waiting...
2A Bourbon Hound 2024
2A Bourbon Hound OG
Charter Life Member
Benefactor
Supporting Member
Multi-Factor Enabled
There’s some talent in the room
Little far advanced for 15 or 1690 🤣
Look up solar kiln. You have to heat the wood for a period of time. @Scsmith42 can give you the specifics.How do I go about doing that? Never even crossed my mind. I was thinking about filling in all the holes with black epoxy or mixing the sawdust and glue and filling in as much as I could
There’s some talent in the room

My latest project is upgrading my Dust Collection system. I've been using a 1hp unit with a flex hose for 20+ years and figured it was time to put something more substantial up with my recent shop upgrade (moved into the larger side of my garage). I mapped it out in the pictures below. I will try to take actual photos once it is completed. I have been filming everything, so the process is quite a bit slower than if I just did it.since you asked... I've done a few things. This is not my profession- just a hobby. But, I've been thinking lately of how to turn this into an income stream. I tend to bounce around and learn new techniques and styles, so I have considered building content for a YouTube channel. I've filmed a few projects so far, but haven't jumped in with posting anything yet.
View attachment 741887View attachment 741888View attachment 741889View attachment 741890View attachment 741891View attachment 741892View attachment 741893
View attachment 741906View attachment 741912View attachment 741933View attachment 741934View attachment 741935
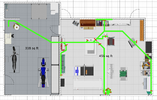
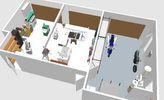
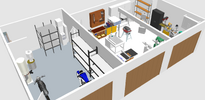
Dust collection is one thing I'm lacking in. Right now I'm using a Dustopper Pro with a shop vac. It get's all the big stuff from the planer and jointer, most of the stuff from the miter saw, and some from the table saw. It's the fine stuff that'll cause health problems though that it only gets some of. It's better than nothing but I need more.My latest project is upgrading my Dust Collection system. I've been using a 1hp unit with a flex hose for 20+ years and figured it was time to put something more substantial up with my recent shop upgrade (moved into the larger side of my garage). I mapped it out in the pictures below. I will try to take actual photos once it is completed. I have been filming everything, so the process is quite a bit slower than if I just did it.
If you're interested, I'll be selling my 1hp Delta dust collector as soon as I get my new one up and running. Hopefully, that will be in a week or so. I can clean it up and take some photos and let you know the details. It works fine- just ready for something more powerful. If you're in Surry County, you probably aren't far from me in Pfafftown.Dust collection is one thing I'm lacking in. Right now I'm using a Dustopper Pro with a shop vac. It get's all the big stuff from the planer and jointer, most of the stuff from the miter saw, and some from the table saw. It's the fine stuff that'll cause health problems though that it only gets some of. It's better than nothing but I need more.

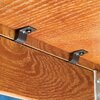
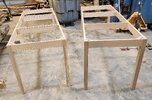
We used tabletop clips. Detail below:@Scsmith42
How do you attach the legs to the table?
View attachment 741803
I have (3) old growth pine slabs that are 5/4 x 20" x 11'-4" that I want to make into tables for my G-kids.
Legs are what I'm not sure how to attach.
I looked at metal wire legs, but same issue with the finished thickness being around 1".
Thanks,
Ron
Didn't take a lot of talent but I made these Scrabble squares for my daughter
View attachment 741961
I really like taking a piece of scrap wood and making something out of it. Those 3½" squares were made from a scrap piece of 2x6 white pine that came out of a late 1700/early 1800s tavern in the Mohawk Valley. I think the new addition was put on the house in 1810.
Nice marquetry. Looks really well done.Just a couple things ive done recently… yeah, i got the wood sicknesses as well. Lol!
View attachment 742354View attachment 742361
Yeah, I've considered doing this professionally a few times, but every time, I run the numbers and realize that it would take me years (or not at all) to get back up the level I am now with my current job. Plus, part of what I like is the creative control of building what I want, when I want. If I were doing it for someone else, I'd lose that. Maybe one day- I'm thinking through that process now, but I'm not sure I have a business model that makes sense.Thanks billho, the amount of hours put into this stuff is staggering! Folks tell me to sell the stuff, but by the time you factor your time you make like 50 cents an hour!
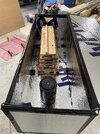
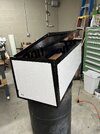
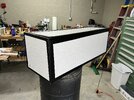
would the wood fit in the oven in your kitchen? If so, can you put it on the lowest setting? Just wondering, since it seems to be fairly short pieces.I built a hot box according to @Scsmith42 instructions. I need to sanitize some wood with possible warms. It came out good. I snagged my wife’s bathroom heater to use in the box but the overheat protection is making it impossible to keep at 140° for 4 hours.
Any ideas that won’t burn my house down? We have some pretty days so I can set it up outside if I need to.
What can I use? Heat lamp? Chicken warmer? What else?
View attachment 752893
View attachment 752894
Yes/no. My oven only goes down to 180. I don’t want to cook the wood nor set the house on firewould the wood fit in the oven in your kitchen? If so, can you put it on the lowest setting? Just wondering, since it seems to be fairly short pieces.
It gets to 180 then shuts down and drops to 60 for several minutes. It doesn’t take long to dropWhat temperature does it get to and for how long before it shuts down?
oh, OK. I think mine goes to 150, but I'm not sure, now that you mention it.Yes/no. My oven only goes down to 180. I don’t want to cook the wood nor set the house on fire
I saw that in the article you sent. I’m having a hard time believing the wood will heat evenly without being enclosed???Turn the box upside down and block it a foot or two above the heater, with the bottom side open. That will solve the over temp problems.
I’ll claim this piece. I’m happy how it turned out. It’s in lowspeed’s bar in Pineville. This is the first woodworking piece I’ve sold. Maybe this is the start to my cabinet business I dream of starting. 😬
View attachment 754325View attachment 754326
You can buy a thermostatically controlled outlet with a probe that monitors the temperature in the box, and use it to supply a simple heater that doesn't have a high-temperature cutoff.I built a hot box according to @Scsmith42 instructions. I need to sanitize some wood with possible warms. It came out good. I snagged my wife’s bathroom heater to use in the box but the overheat protection is making it impossible to keep at 140° for 4 hours.
Any ideas that won’t burn my house down? We have some pretty days so I can set it up outside if I need to.
What can I use? Heat lamp? Chicken warmer? What else?
View attachment 752892View attachment 752893
View attachment 752894

