You are using an out of date browser. It may not display this or other websites correctly.
You should upgrade or use an alternative browser.
You should upgrade or use an alternative browser.
Tradesmen: Show us your at work projects
- Thread starter SpecialK
- Start date
- Replies 401
- Views 17,766
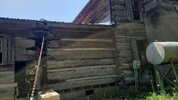
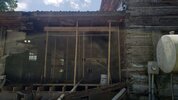
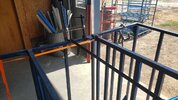
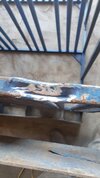
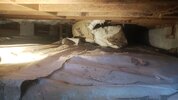
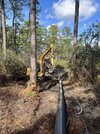
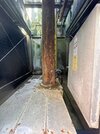
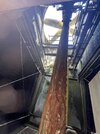
Are you renovating or destroying a log building?More fun today.View attachment 503117View attachment 503118
How old is it?
np307
Happy to be here.
Are you renovating or destroying a log building?
How old is it?
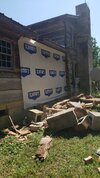
What are you going to do with the logs you've taken out?
Original log home was built in 1880. Moved to current location in 1980 and an addition was built on in the same log style. When they built the addition, they didn't flash the roof and 40 years later the water and termite damage is what we are dealing with to get the place restored.
Originally hoped we could save the logs but they are basically just termite dust. The one log that the chain was hooked to is the only good one, it may get used in building the kitchen table but you can't mill it because of the massive twisted spikes they used to tie the rafter to the log.
Unfortunately the only thing feasible to do was to go back with modern framing. Thankfully the original cabin logs are all sound enough to stay. The logs removed were from the 1980 addition.
biganimal
Well-Known Member
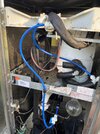
I love those John Guest fittings. I have installed filters on many of those coolers in my day.View attachment 503224
I re-plumbed a couple lines in this water cooler this morning at work.
SO easy!I love those John Guest fittings. I have installed filters on many of those coolers in my day.
I just deleted a picture to save the stomachs of those that can’t handle it, so I’ll describe it.
The poo line for two bathrooms at work clogged up, causing EVERYTHING to back up out of the floor drain. There was poo…..everywhere.
Respect to the plumbers of the forum.
And I mean everywhere. It was backing out into the office hallways.
Edit: For those of you that are curious/disturbed, the picture is now on the basement….where it belongs.
Last edited:
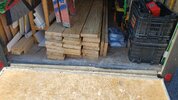
Forklift drivers keep me employed. Seems like everyday I’m repairing something they’ve hit.Been fixing messes made by forklift drivers this week. View attachment 509037View attachment 509038
This bad boy got stuck in Jan of 2017
5 years of thinking?? Man, I thought my company procrastinated.
Nah. Just took me till now to find the pictures. Several phones down the road and I finally found these on my computer when it got traded out for a new one.
np307
Happy to be here.
No doubt. Between September of last year and March of this year I fixed between 150 and 200 of these things.Forklift drivers keep me employed. Seems like everyday I’m repairing something they’ve hit.
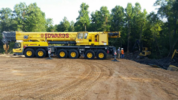
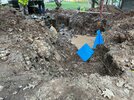
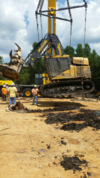
Rigged and ready to lift.

Had to use the excavator to break the suction from the mud. Crane scales were registering 99k at this point.
Finally broke it free.
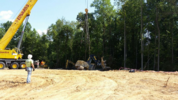
Now to dig out the mud. We got over 15k worth of mud out of the tracks.
Now to load her up and chain her down.
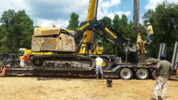
We had to build a road in to get to this thing. The crane came in with six tractor trailers to haul all the pieces in. Very interesting day to say the least.

Had to use the excavator to break the suction from the mud. Crane scales were registering 99k at this point.
Finally broke it free.

Now to dig out the mud. We got over 15k worth of mud out of the tracks.

Now to load her up and chain her down.

We had to build a road in to get to this thing. The crane came in with six tractor trailers to haul all the pieces in. Very interesting day to say the least.
They're the worst!Been fixing messes made by forklift drivers this week. View attachment 509037View attachment 509038
So cool. What a great job to have.I repair guns for Uncle
Rewrapping a 84mm Carl Gustav Recoilless rifle
View attachment 444744
10.3" M4A1 URG
View attachment 444745
Mk44 Mod 3 7.62mm Minigun
View attachment 444746
Been learning to sew lately
View attachment 444747View attachment 444748View attachment 444749
And make Kydex holsters
View attachment 444750View attachment 444751
CD
ronn47
Where's the Scotch?
2A Bourbon Hound 2024
2A Bourbon Hound OG
Charter Member
Benefactor
Life Member
Multi-Factor Enabled
Yes, the only issue is his office location.So cool. What a great job to have.
Yes that is a thorn in the flesh.Yes, the only issue is his office location.
Maybe when he gets home he’ll keep it up and allow us to purchase some of his workmanship.
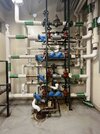
We’re having dinner until the glue sets. It will be 9pm till we cut it on to test check.
Then another 2 hours flushing the building
heavydoc
The Southern President
2A Bourbon Hound 2024
2A Bourbon Hound OG
Benefactor
Life Member
Supporting Member
Multi-Factor Enabled
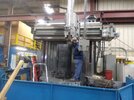
He almost looks life like!
He almost looks life like!
That's our new intelligent control, complete with sentience and dilemma solving capacity.
A number of years back we did a large milling, drying and millwork job for a local church that was building a YMCA adjacent to their sanctuary. They shipped in several log trucks of southern yellow pine logs, along with some large white oak and red maple logs that were harvested from the site. We milled, kiln dried, and then processed the lumber into interior and exterior trim and other uses. Some of the largest white oak slabs were made into slab tables for the common areas of the church and YMCA.
When we completed that job, we still had a few boule's of WO and RM leftover, which we've been slowly selling off for them as the opportunity arose.
Recently they asked if we could make a couple of library tables from some of the leftover WO. They wanted something 8' long, but light enough to be portable.
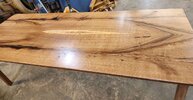
Below is the result.
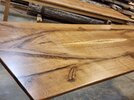
Table 1 was made from a center cut (quartersawn) 11/4 character slab. The slab was resawn into a pair of bookmatched planks, and then we assembled them into the pattern below. Pith voids were filled with black epoxy. It was a bit of a challenge due to all of the stresses present in the lumber. The multiple pith's from the limbs all wanted to move in different directions, and each one of the resawn bookmatched slabs also had to be ripped down the middle and reglued in order to help alleviate the results of the reaction wood present.
Although challenging, I am pleased with the character of the end result.
Below is an end view of the same table.
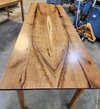
And here is an opposing corner view.
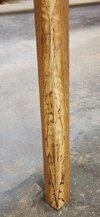
The legs were made from a 3 piece glue up of edge spalted, quartersawn WO, with veneer sliced off of the two "show sides" and then bookmatched glued around the corner to cover the seams from the glue up. I enjoy this technique. It provides for a more stable leg and allows me artistic freedom to create a piece with character that spans around the corners. The edge glue lines tend to disappear since they are located on the corners of the leg.
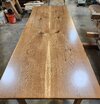
Here is the second top. This one was not a center cut, but was selected for both the spalting and edge grain character that is showcased in the middle of the table. The resawn planks were also ripped to allow for addressing the stresses; I'm pleased with how the glue lines disappeared though. Although it's difficult to tell from the photo's, both tops are actually 4 boards glued together on edge. The center match is obvious due to the bookmatch, but the other two are less so....
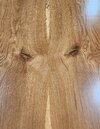
Below is a close up of the grain character in the center of table 2.
Here are the two bases before finishing and attaching the tops.
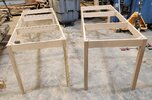
With the needs of the sawmill and kiln operation, along with running the farm, I don't get a chance to do much woodworking. Typically I refer clients to local woodworking artisans. In this case though, it's a good customer and we have a connection to the wood. All in all a fun project and I'm pleased with the results.
When we completed that job, we still had a few boule's of WO and RM leftover, which we've been slowly selling off for them as the opportunity arose.
Recently they asked if we could make a couple of library tables from some of the leftover WO. They wanted something 8' long, but light enough to be portable.
Below is the result.
Table 1 was made from a center cut (quartersawn) 11/4 character slab. The slab was resawn into a pair of bookmatched planks, and then we assembled them into the pattern below. Pith voids were filled with black epoxy. It was a bit of a challenge due to all of the stresses present in the lumber. The multiple pith's from the limbs all wanted to move in different directions, and each one of the resawn bookmatched slabs also had to be ripped down the middle and reglued in order to help alleviate the results of the reaction wood present.
Although challenging, I am pleased with the character of the end result.

Below is an end view of the same table.

And here is an opposing corner view.

The legs were made from a 3 piece glue up of edge spalted, quartersawn WO, with veneer sliced off of the two "show sides" and then bookmatched glued around the corner to cover the seams from the glue up. I enjoy this technique. It provides for a more stable leg and allows me artistic freedom to create a piece with character that spans around the corners. The edge glue lines tend to disappear since they are located on the corners of the leg.

Here is the second top. This one was not a center cut, but was selected for both the spalting and edge grain character that is showcased in the middle of the table. The resawn planks were also ripped to allow for addressing the stresses; I'm pleased with how the glue lines disappeared though. Although it's difficult to tell from the photo's, both tops are actually 4 boards glued together on edge. The center match is obvious due to the bookmatch, but the other two are less so....

Below is a close up of the grain character in the center of table 2.

Here are the two bases before finishing and attaching the tops.

With the needs of the sawmill and kiln operation, along with running the farm, I don't get a chance to do much woodworking. Typically I refer clients to local woodworking artisans. In this case though, it's a good customer and we have a connection to the wood. All in all a fun project and I'm pleased with the results.
Last edited:
Well, I'm not so much a tradesman but I was a part of this project. We did a fair amount of prototype work where I used to work. Enough time has passed that I can post this now, a caliper crossover tube for a Brembo caliper. I was not the bender operator but I was fascinated watching it run.
.
.
Last edited:
np307
Happy to be here.
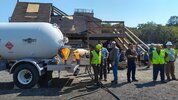
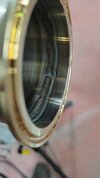
First day off in a while. Just finished up a dairy plant job yesterday. Switched back over to welding from construction and got about 2 days of shop time to get acquainted with this welding style. Been struggling with these short ferrule connections and had one as my final weld last night. Nailed it. Very satisfying feeling. 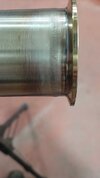


One of my Guys found an "oil" spot in an electrical rm. today. Looked up and saw a drip coming out of a 24x24 pull box. with the feeders to a 1200 amp Distribution panel.
Inside was this:
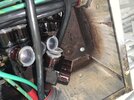
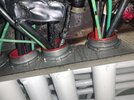
Yeah.. not good. Going to be a long night getting this Computer Lab back up and running.
Funny thing is , its fed by a UPS , it should have sent out an output over amp or voltage drop when this happened. OH, and it's still powered up and running !
Inside was this:


Yeah.. not good. Going to be a long night getting this Computer Lab back up and running.
Funny thing is , its fed by a UPS , it should have sent out an output over amp or voltage drop when this happened. OH, and it's still powered up and running !
Last edited:

