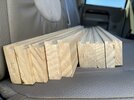
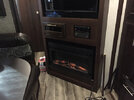
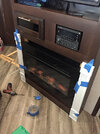
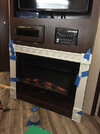
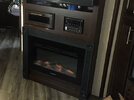
Started building a smaller chicken coop today for here (not my parents house). It’s going to be a box 41”x48”x3“6”-4’ tall on top of 2’ legs with a slanted roof. Size is because i have a stained piece of plywood for the floor that size. Made 2x4 L-shaped legs and cut a couple of 2x8’s to make a box frame and got half the legs drilled and bolted using carriage bolts. Need more bolts, it takes 16 total. Broke a 1/2” drill bit, snapped right off. Had a good hold on the 1/2” Milwaukee drill that will snap your wrist and the bit gave when it seized. Tomorrow plan to finish the legs and do (start) the wall framing. That should be easier as it will be on the bench. The idea is to make the thing in modular sections, bring it over here and then assemble the sections.
You are using an out of date browser. It may not display this or other websites correctly.
You should upgrade or use an alternative browser.
You should upgrade or use an alternative browser.
Home Projects you’re working on.
- Thread starter Mirac
- Start date
- Replies 613
- Views 16,608
Burt Gummer
May Have Shorter Meme Posting Times Than U Normies
Staff member
2A Bourbon Hound 2024
2A Bourbon Hound OG
Charter Life Member
Benefactor
Vendor
Supporting Member
Salesman of the Year
Multi-Factor Enabled
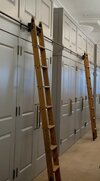
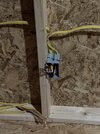
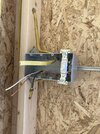
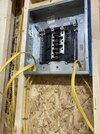
Wired Diana’s building the last couple months as we got a free evening. Space between the two lofts in it was 22’ long. Built a 2’ wide 22’ long shelf down the top of each wall and connected it to the lofts in the front and back. Got it insulated last week. Sheetrock this fall. Making part of it an art studio for her daughter. I have 2 ceiling fans left to hang, and one more security light to add in the back. Probably gonna put a mini split heat pump on it before we Sheetrock the front half so I can add another circuit for the little heat pump. Friend of mine who is a licensed electrician came out and made it hot from the house and double checked all my work.
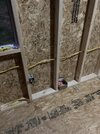
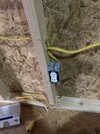


I tried to find a YT video of that scene from the 80s movie, Enemy Mine with the tag line “looks like sheet”. But couldn’t. Actually. Looks like good work.Wired Diana’s building the last couple months as we got a free evening.
Burt Gummer
May Have Shorter Meme Posting Times Than U Normies
Staff member
2A Bourbon Hound 2024
2A Bourbon Hound OG
Charter Life Member
Benefactor
Vendor
Supporting Member
Salesman of the Year
Multi-Factor Enabled
I tried to find a YT video of that scene from the 80s movie, Enemy Mine with the tag line “looks like sheet”. But couldn’t. Actually. Looks like good work.
I tried to do it right. The guy that looked at it blessed it without having me make any changes. I need to add nail plates on the studs to protect the wires, and the building wasn’t built to be sheetrocked so I have to add some dead wood in the corners for the Sheetrock to nail to.
I was at Lowe‘s yesterday hoping for inspiration in some rafter hangers. Saw they have ‘nail plates” on the shelf. Those are exactly what you’re looking for.I tried to do it right. The guy that looked at it blesses it without having me make any changes. I need to add nail plates on the studs to protect the wires, and the building wasn’t built to be sheetrocked so I have to add some dead wood in the corners for the Sheetrock to nail to.
Side note, when my wife’s pottery shop was being built, the plumber put a nail / screw right through the water line of a big double sink in the shop. I wondered why there was a square block of wood in the middle of the wall near the sink faucet. Guess he patched it with a PEX joint and put wood over it. He then covered the whole area with a waterproof sheeting against spray, so nobody but he and I know.
BigWaylon
Head philatelist
Staff member
2A Bourbon Hound 2024
2A Bourbon Hound OG
Charter Life Member
Benefactor
Supporting Member
Multi-Factor Enabled
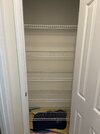
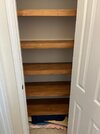
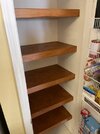
This one is simple enough I’m about to tackle it in the next couple weeks…gonna do the pantry and linen closet and see how it goes.
BigWaylon
Head philatelist
Staff member
2A Bourbon Hound 2024
2A Bourbon Hound OG
Charter Life Member
Benefactor
Supporting Member
Multi-Factor Enabled
Burt Gummer
May Have Shorter Meme Posting Times Than U Normies
Staff member
2A Bourbon Hound 2024
2A Bourbon Hound OG
Charter Life Member
Benefactor
Vendor
Supporting Member
Salesman of the Year
Multi-Factor Enabled
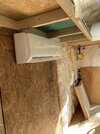
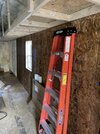
Got a 3/4 ton mini split heat pump for the building. @LeeMajors came yesterday and helped me install it. We decided against Sheetrocking the walls. After taping and sanding and painting and the cost of sheetrock, we decided to use OSB since it’s came down to about $14 a sheet and Sheetrock is $12 a sheet. Putting it up with screws so for some reason it ever needs to come down it’ll be easy. Diana and her daughter are gonna put kilz over the osb and see how that turns out.


BigWaylon
Head philatelist
Staff member
2A Bourbon Hound 2024
2A Bourbon Hound OG
Charter Life Member
Benefactor
Supporting Member
Multi-Factor Enabled
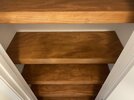
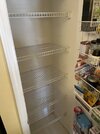
Click the IG link I posted above. It’s 1/4”.How thick on the pantry shelves? My wife wants me to do the same to ours. Those wire racks suck when it comes to things not tipping over.
Burt Gummer
May Have Shorter Meme Posting Times Than U Normies
Staff member
2A Bourbon Hound 2024
2A Bourbon Hound OG
Charter Life Member
Benefactor
Vendor
Supporting Member
Salesman of the Year
Multi-Factor Enabled
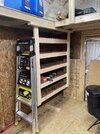
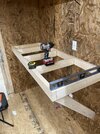
Lmao. Is that HER ladder.Built a set of shelves today for @Lil D to store canned food on in her new building. Uprights and the 2x4’s attached to the wall are done so with 4” load rated screws. The space between them is a little taller than a quart jar. She should be able to store a bunch or jars there.
View attachment 538044
Burt Gummer
May Have Shorter Meme Posting Times Than U Normies
Staff member
2A Bourbon Hound 2024
2A Bourbon Hound OG
Charter Life Member
Benefactor
Vendor
Supporting Member
Salesman of the Year
Multi-Factor Enabled
Yes. Yes it isLmao. Is that HER ladder.
I’m not sure it’s tall enoughLmao. Is that HER ladder.
I need two of these in my shop for accessing soffit shelving.
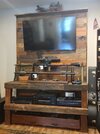
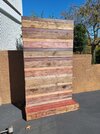
Most of my life I wasn't very handy, but the last few years I'm learning more and more. I recently built this in my home office out of leftover pallets from another project, with the basic tools I own. (RPG 2 and 7 were gifts, and yes, I still listen to vinyl and CD's pretty often!)
View attachment 538307
Looks really good did you stain or put any type of poly treatment on the pallets? just curious the colors really come out.
Thank you. Yes, I used a few different type of stains.Looks really good did you stain or put any type of poly treatment on the pallets? just curious the colors really come out.
This one was made out of the last pallet and some scrap platform bed frame supports/slats. Thinking about making a small bar out of it......wife says I need to get a job!
Last edited:
Burt Gummer
May Have Shorter Meme Posting Times Than U Normies
Staff member
2A Bourbon Hound 2024
2A Bourbon Hound OG
Charter Life Member
Benefactor
Vendor
Supporting Member
Salesman of the Year
Multi-Factor Enabled
BigWaylon
Head philatelist
Staff member
2A Bourbon Hound 2024
2A Bourbon Hound OG
Charter Life Member
Benefactor
Supporting Member
Multi-Factor Enabled
We’ve been in this house since it was built in ‘99. Not sure why I haven’t taken on this project in the past 23 years. With 9’ ceilings, there’s a lot of wasted space in our master bedroom closet due to minimal shelving. So for example, on my side I have a tower of hoodies and sweaters that about once a year tumble down to the floor. She has shoes and piles of clothes on the floor, and even shoes lined up in the bedroom. I bought all the stuff I needed over the last week or so, and spent most of today emptying shelves, adding more shelves, and restocking shelves.
In case it’s not clear, I added a shelf about 10” from the ceiling almost completely around the closet. And then there’s the shelf on the back wall (with her bags on it) that I continued on both sides as well as turning the corner towards the SBR. ETA: 34’ of shelving added
Here’s a before and after set of pictures in every direction…
Wall in bedroom:


(Shoes are gone, trash bag is her goodwill stuff I added to today)
Her shoes:


Her clothes hanging, my stuff on the shelf:


My stuff hanging, her shoes shoved underneath:


Her stuff hanging (except for some of mine on the far right), plus her bags and some older tees folded on the shelf:

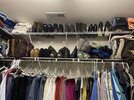
Her shoes and piles of clothes:


Her stuff hanging, and her stuff on the shelf:


The HD SBR:


Lower half of closet:


Upper half of closet:


Not even going to try and deny some of that stuff needs to be donated/trashed…but at least it’s easier to deal with now. I’m sure we’ll do some reshuffling to get her stuff where she wants it, but I did it without even letting her know I was planning on it. Also need to buy a step stool to keep in there.
In case it’s not clear, I added a shelf about 10” from the ceiling almost completely around the closet. And then there’s the shelf on the back wall (with her bags on it) that I continued on both sides as well as turning the corner towards the SBR. ETA: 34’ of shelving added
Here’s a before and after set of pictures in every direction…
Wall in bedroom:


(Shoes are gone, trash bag is her goodwill stuff I added to today)
Her shoes:


Her clothes hanging, my stuff on the shelf:


My stuff hanging, her shoes shoved underneath:


Her stuff hanging (except for some of mine on the far right), plus her bags and some older tees folded on the shelf:


Her shoes and piles of clothes:


Her stuff hanging, and her stuff on the shelf:


The HD SBR:


Lower half of closet:


Upper half of closet:


Not even going to try and deny some of that stuff needs to be donated/trashed…but at least it’s easier to deal with now. I’m sure we’ll do some reshuffling to get her stuff where she wants it, but I did it without even letting her know I was planning on it. Also need to buy a step stool to keep in there.
Last edited:
@BigWaylon please delete those pics before my ole lady sees them and starts side eyein me.
dang, what's the load rating of your closet floor/walls. That's a ton of stuff.
Getting closer. 1/4 acre, spring fed. Buddy did the digging for us. Rye/fescue blend & straw courtesy of me. We’re putting down geotextile cloth in the southeastern corner & along a shelf on the western bank in prep for pea gravel & rip rap. Pond’s cloudy as hell due to a recent 3” rain & about 2’ below normal pool. Whistle’s going in shortly as well.
Looking NW-
Looking due East. That 8x12 cargo box will become the tiki bar, setup on the dam under a 16x24 pavilion.

Facing SE from the dam. This will be the view from the “Drunken Flamingo".

Bar/patio will be powered, both for the beer fridge & blender & also to run the aerator compressor. That cutout looking spot is the “boat launch” for the missus’ paddle boat, the “Anita Margarita”. Said vessel will also be used for grandnieces/nephews to explore the high seas. I’ll also be building a little bridge to the island for the missus’ & the little ones’ enjoyment.
Fathead minnows & grass shrimp will have the pond to themselves till about May, when redear sunfish & hybrid bluegill (redear x bluegill, vs the typical green sunfish x bluegill) will go in. Smallmouth bass & yellow perch will go in later that fall.
Our goal is a family party spot/fishing hole & a reliable source of one my favorite forms of protein.
Looking NW-

Looking due East. That 8x12 cargo box will become the tiki bar, setup on the dam under a 16x24 pavilion.

Facing SE from the dam. This will be the view from the “Drunken Flamingo".

Bar/patio will be powered, both for the beer fridge & blender & also to run the aerator compressor. That cutout looking spot is the “boat launch” for the missus’ paddle boat, the “Anita Margarita”. Said vessel will also be used for grandnieces/nephews to explore the high seas. I’ll also be building a little bridge to the island for the missus’ & the little ones’ enjoyment.
Fathead minnows & grass shrimp will have the pond to themselves till about May, when redear sunfish & hybrid bluegill (redear x bluegill, vs the typical green sunfish x bluegill) will go in. Smallmouth bass & yellow perch will go in later that fall.
Our goal is a family party spot/fishing hole & a reliable source of one my favorite forms of protein.
Last edited:
Clicker
Well-Known Member
I feel BW's pain regarding closet reno, I did this a while back to ours.
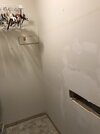
The original closet with a bit of wire shelving;
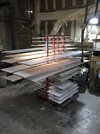
Plywood panels, edge banded and painted in my buddies shop.
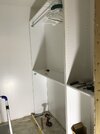
Install underway;
Opposite side;
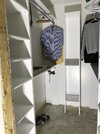
The narrow shelving unit in the back is fitted with adjustable cedar shelves and we installed a mirrored bifold door to finish it off.
The original closet with a bit of wire shelving;

Plywood panels, edge banded and painted in my buddies shop.

Install underway;

Opposite side;

The narrow shelving unit in the back is fitted with adjustable cedar shelves and we installed a mirrored bifold door to finish it off.
Last edited:
Burt Gummer
May Have Shorter Meme Posting Times Than U Normies
Staff member
2A Bourbon Hound 2024
2A Bourbon Hound OG
Charter Life Member
Benefactor
Vendor
Supporting Member
Salesman of the Year
Multi-Factor Enabled
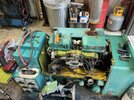
I’d replace everything in that house with pexFound the pipe that was leaking in the living room ceiling. Couple of end stops installed and I'll solder in a new section later this week. Built new in 1990
View attachment 540847View attachment 540848
Burt Gummer
May Have Shorter Meme Posting Times Than U Normies
Staff member
2A Bourbon Hound 2024
2A Bourbon Hound OG
Charter Life Member
Benefactor
Vendor
Supporting Member
Salesman of the Year
Multi-Factor Enabled
Not sure if I saw this but I love it. There's a post I made regarding it.Be curious to hear a review of this and how you like it
@rbell2915 …. Which did you get? Tell us more about it.
Automower
This is my first summer at my house I've put down lots of Bermuda seed and topsoil to have a yard (new construction home) while everyone else has dirt and dead grass. I bought the Automower and it's my favorite tool. This bad boy has adjustable cutting heights, schedules, and does it all for...
Automower 430x. The time and money saving is quite amazing. I have it running from 8a to midnight and it keeps the entire yard maintained.


